Patty Tomanovich | RIT
Atoms and Leaves
group exhibition Why Wait
Rochester Institute of Technology’s (RIT) William Harris Gallery
MFA Thesis show was open from April 4 to Apr 21, 2024.
Section 1: Introduction
The project Atoms and Leaves, like many human projects, blossomed from a personal crisis. I was toying with my gender identity and met with a therapist from my undergraduate health center, and she asked me what it would feel like to transition away from society. She asked me to imagine getting surgery and recovering in the woods, mountains, or on an island somewhere and how that would feel. What impact do our human to human relationships have on our relationship with our body? I found relief in this thought experiment, and I craved feeling natural. Trans bodies are, by design, thought of as artificial and unnatural, and I was interested in pushing back on that feeling I had about my own body.
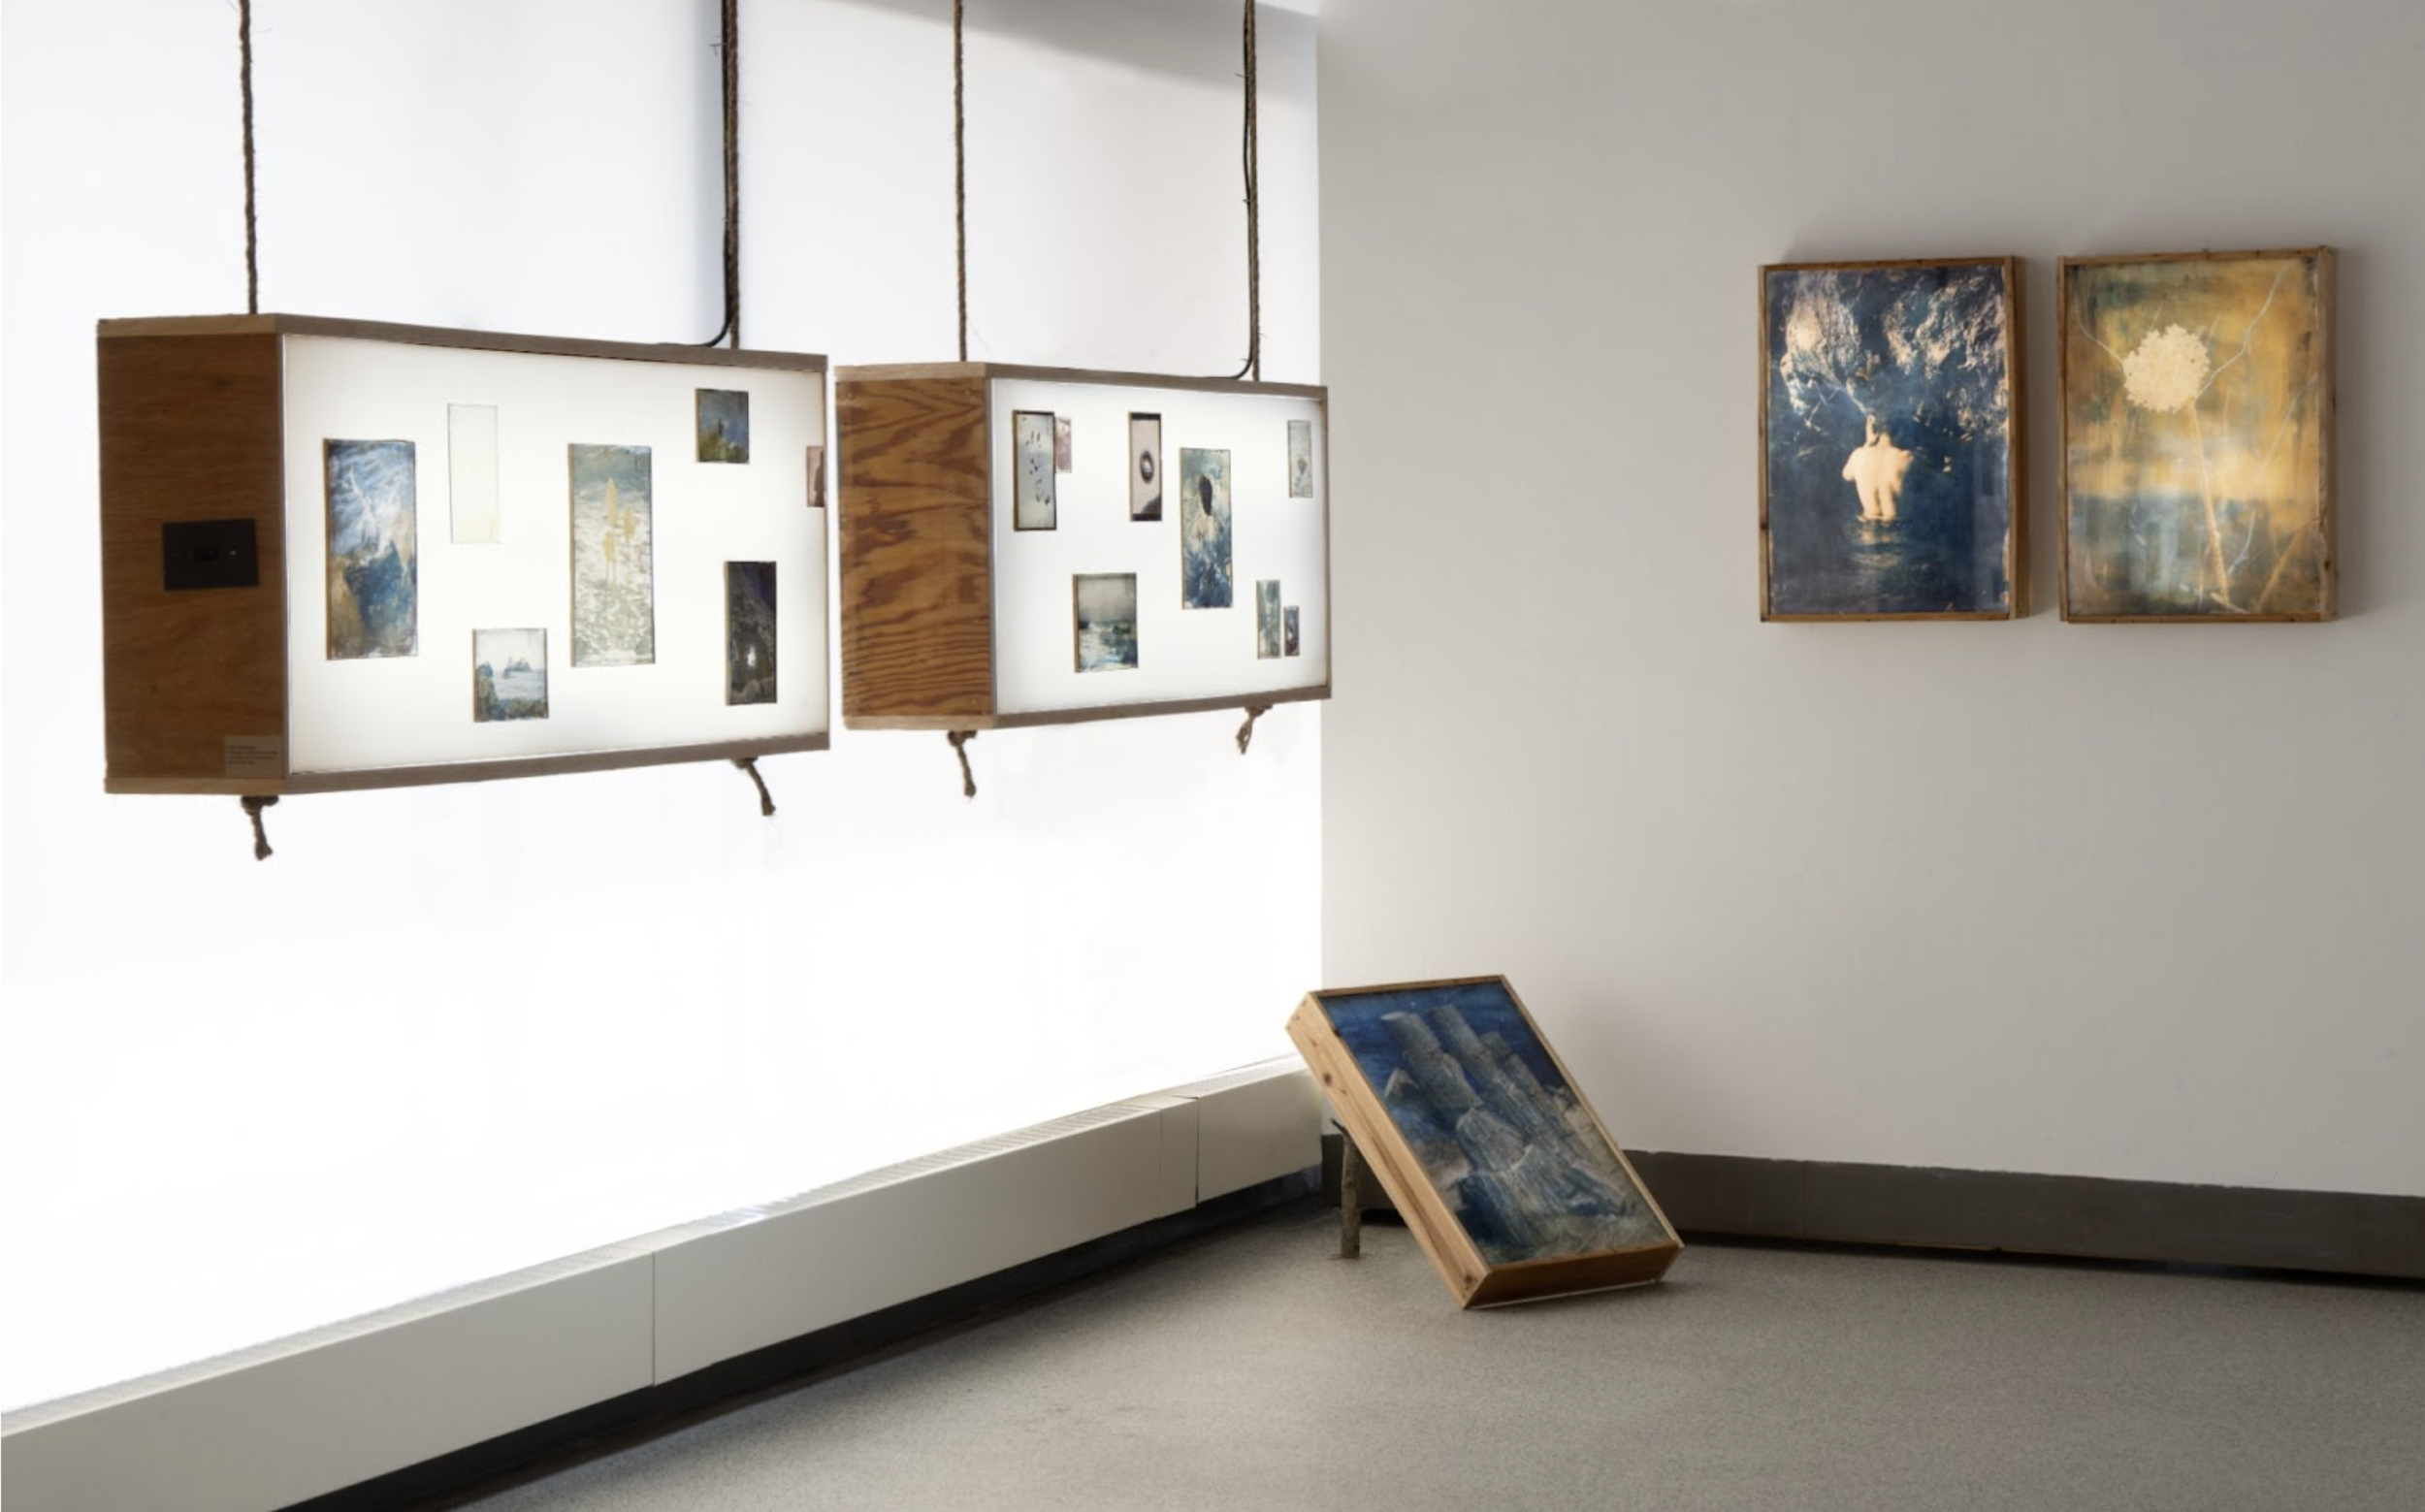
The project envisioned a utopia where transness and nature blurred together in portraits, still lifes, and landscape photographs. 18 images comprised my installation of the work in RIT’s William Harris Gallery in the 2024 MFA Thesis Show Why Wait.
This report calculates how many tons of carbon emissions (tCO2e) the project created through travel, electricity used during installation, the material waste produced by the installation, and the material waste produced by my printing process.
Artist ecology statement
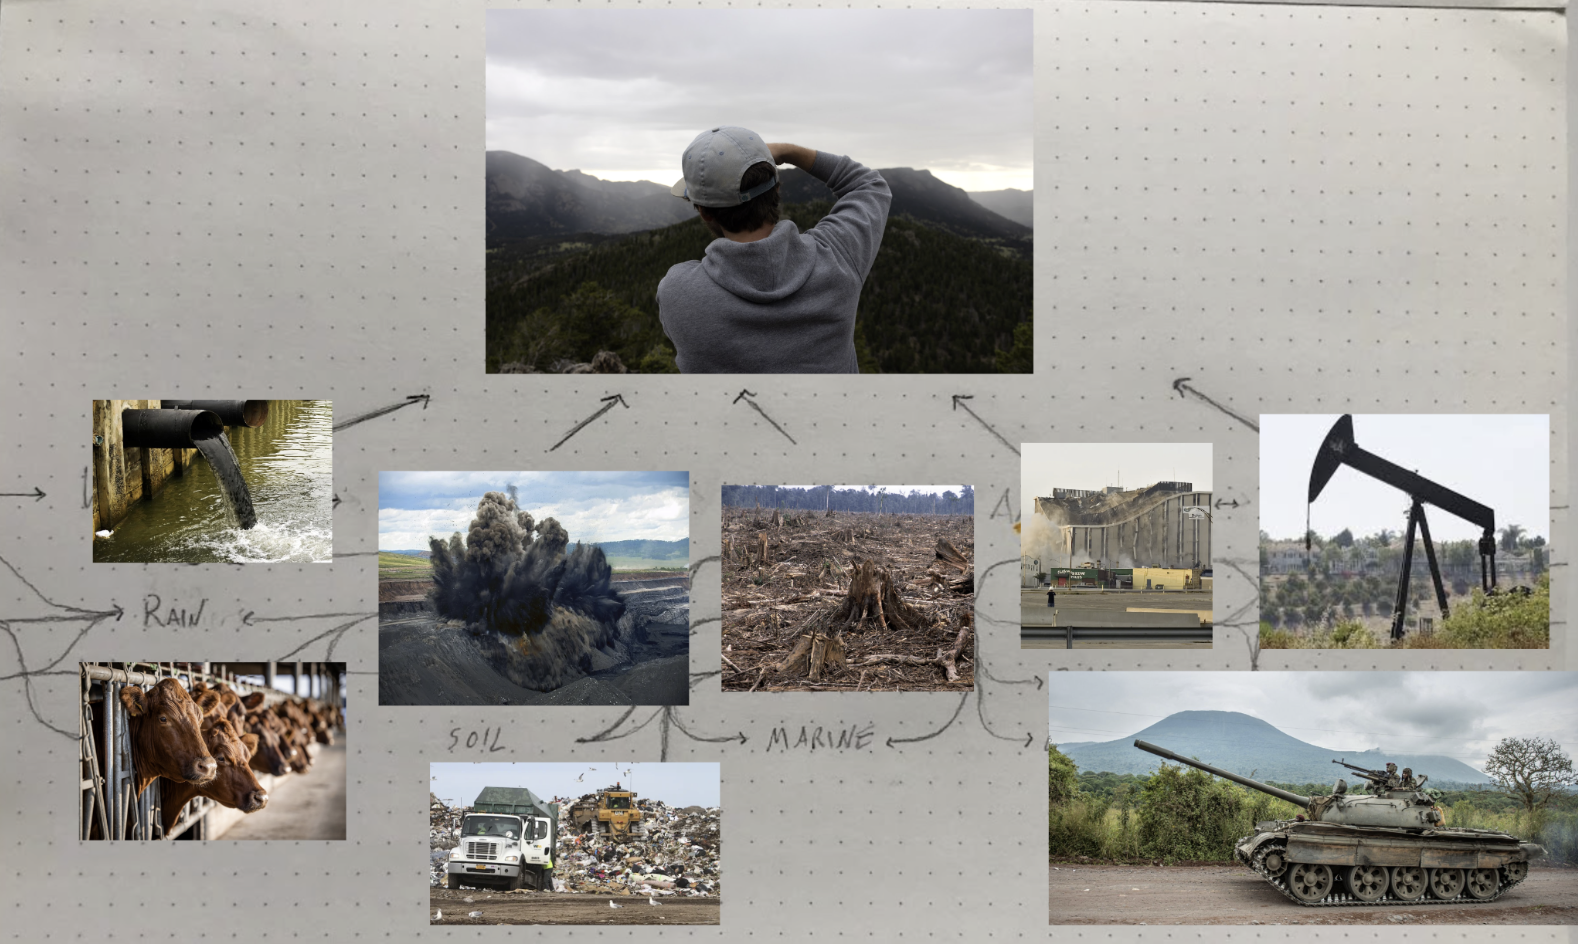
I can not describe the printing process without first describing my personal ecological convictions. Growing up in Rochester, NY, I knew photography caused waste. Kodak was blowing up buildings it no longer used, and I remember helping my dad lift the stainless steel counter tops from one of the doomed Kodak labs to install in our kitchen. A week later that lab was blasted into clouds of rubble, wafting into the adjacent redlined neighborhoods. Rochester soil and groundwater has been riddled with silver halides, and the Genesee River has been dumping Kodak’s waste into Lake Ontario since the late 1800s. In my photography practice, I became resentful of the waste photography created and the violence it could be traced back to.
Although photography has only really been around for a couple hundred years, its roots run deep in the exploitation of the environment and people. Traditional photographic materials made from toxic silver salts destroy the earth when they are sourced and when they are discarded. Digital photography relies on conflict minerals, plastics, and toxic inks.
During my graduate studies, I wanted to create without adding to the destruction. I needed a way of printing my photographs that cut out photography’s most environmentally harmful materials, and I made these limits for myself.
No color inks. Most printer inks are toxic and contain volatile organic compounds
(VOCs). “Green” or biodegradable printer inks free of VOCs are made with palm oil or other products sourced by deforestation. However, there are some biodegradable and sustainably sourced black inks made from algae. So, I decided printing with black would work for me.
No silver. The silver salts used in photochemistry are toxic and have polluted my city’s air and waterways since Kodak was founded in Rochester NY, 1888. Mostly as a symbolic gesture, I wanted to find a way to make a color image without the notoriously harmful chemicals.
Borrow or buy used equipment. Photography equipment in Rochester is bountiful, and not everyone needs their own. I didn’t want the planet to produce a new camera, printer, or computer for this project.
Use discarded substrates. Substrate is the material the image is printed on- usually paper. I wanted the image to be on something used or found, because I knew there were plenty of objects that could hold a photograph and it felt unnecessary to create fresh material. Also, probably because of Kodak’s rise and fall, Rochester Goodwills were stocked with plenty of old photographic paper, transparency sheets, and printer paper.
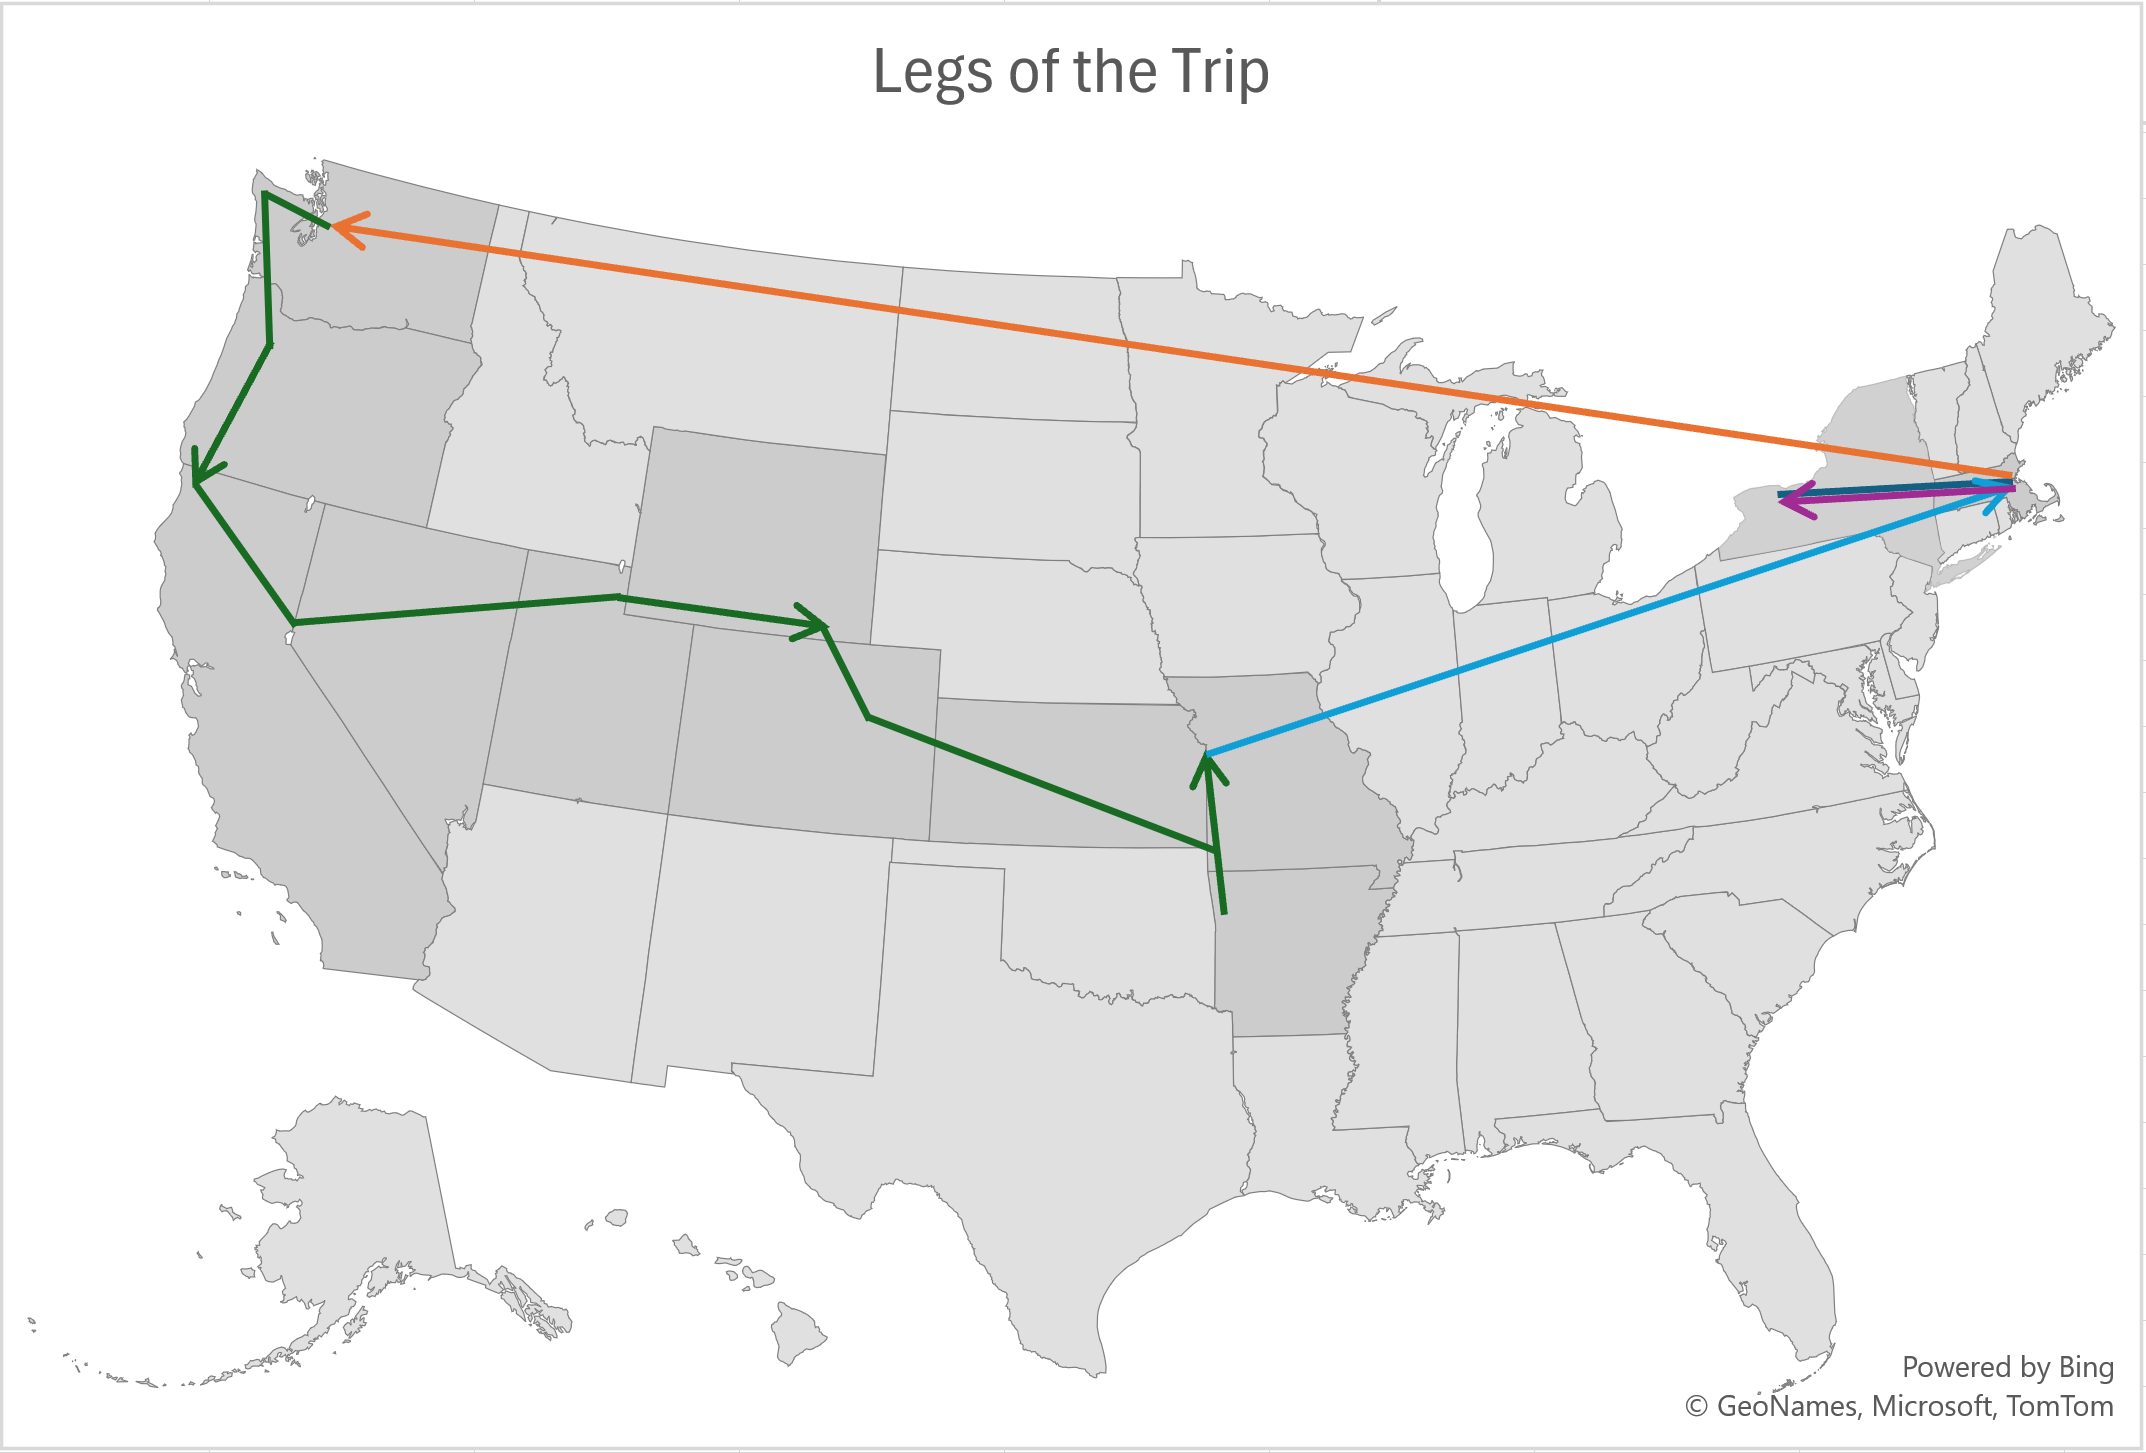
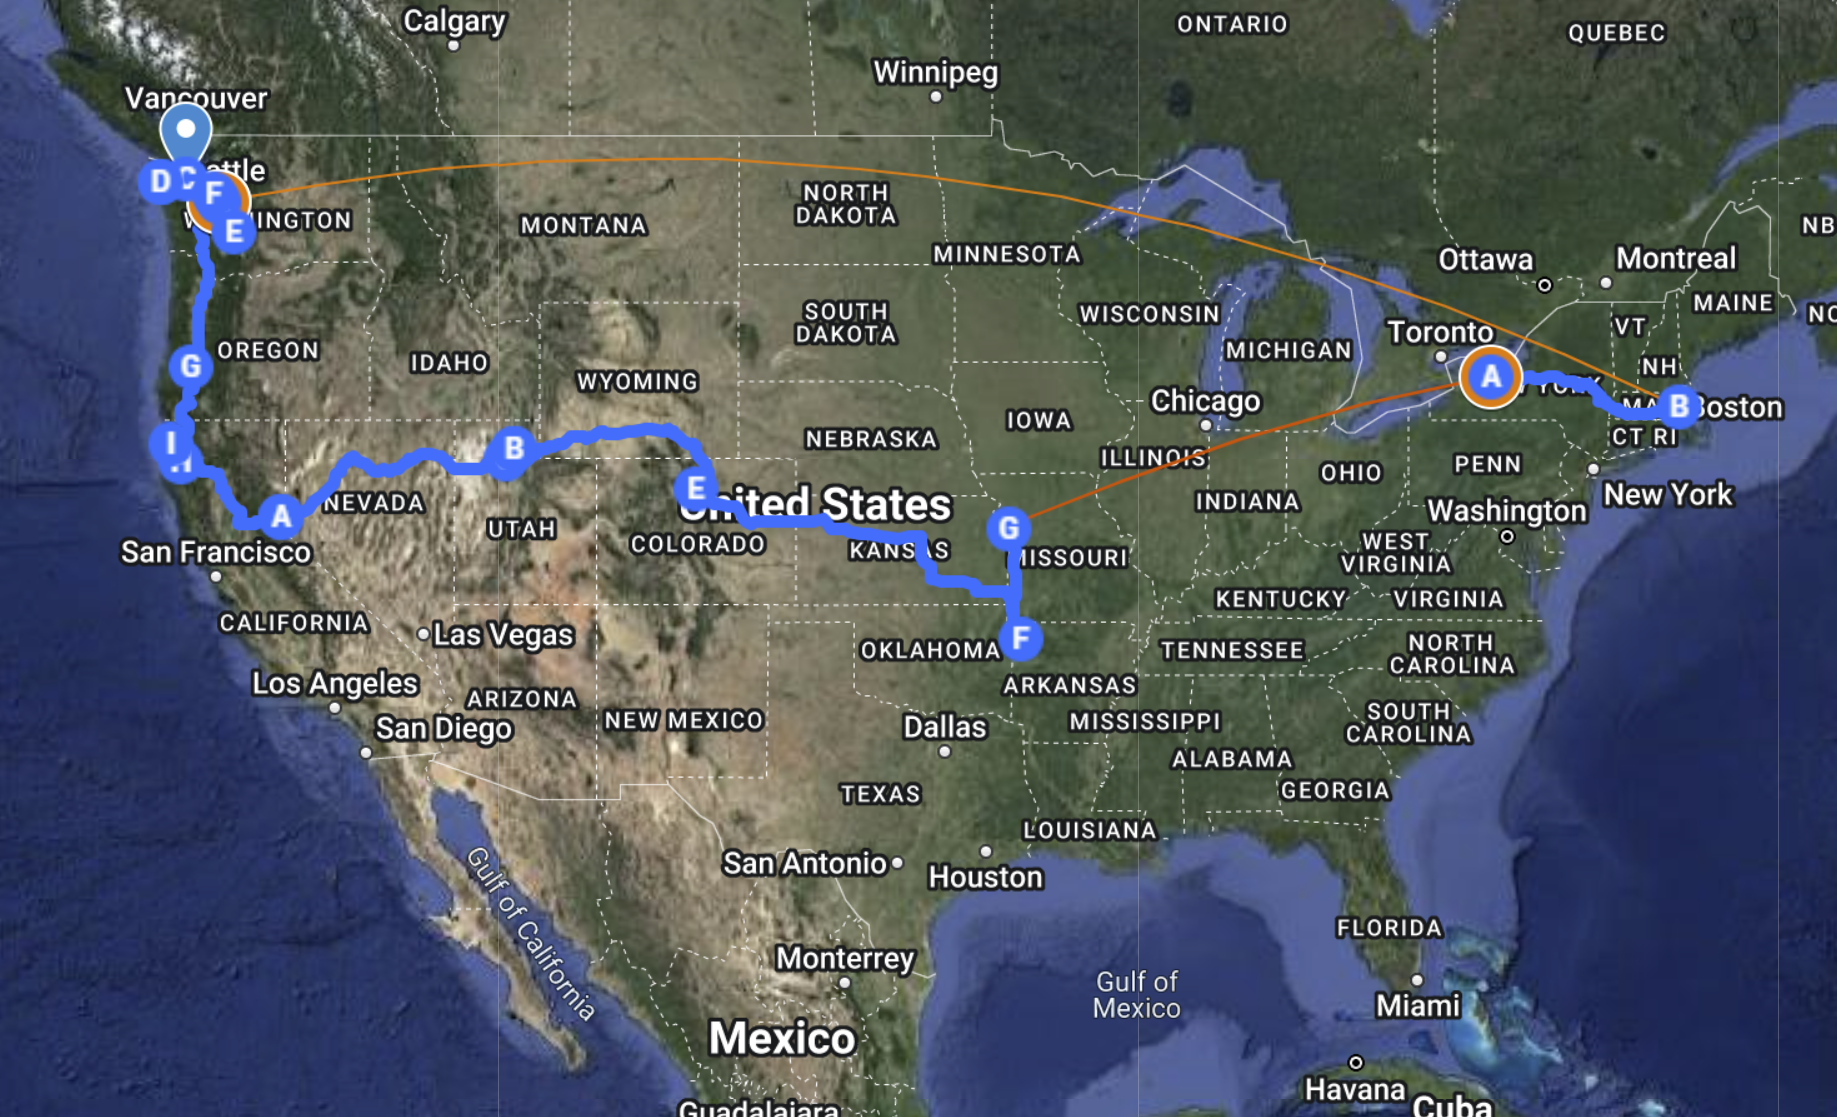
Section 2: Travel
I received and recovered from top surgery after my first year of graduate school and
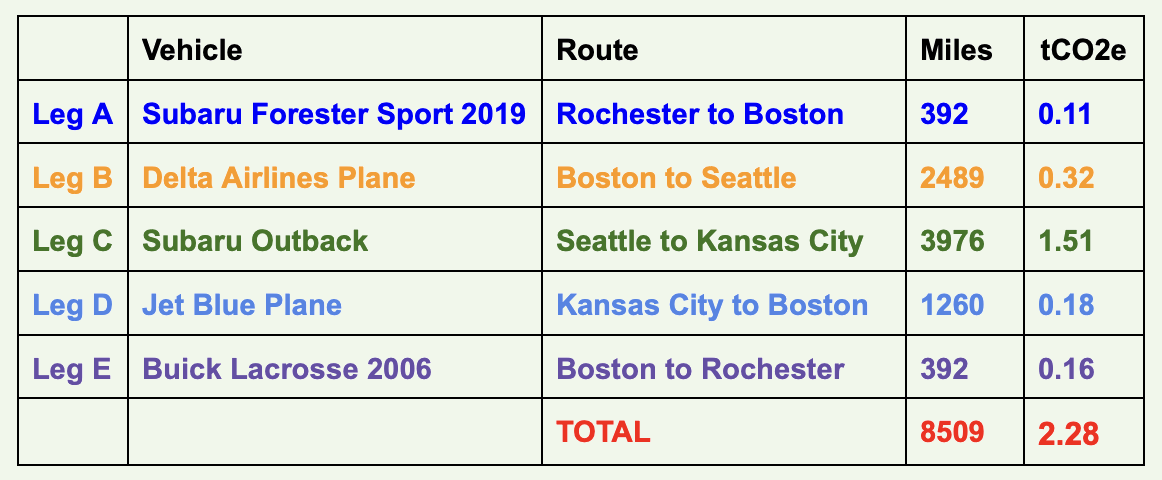
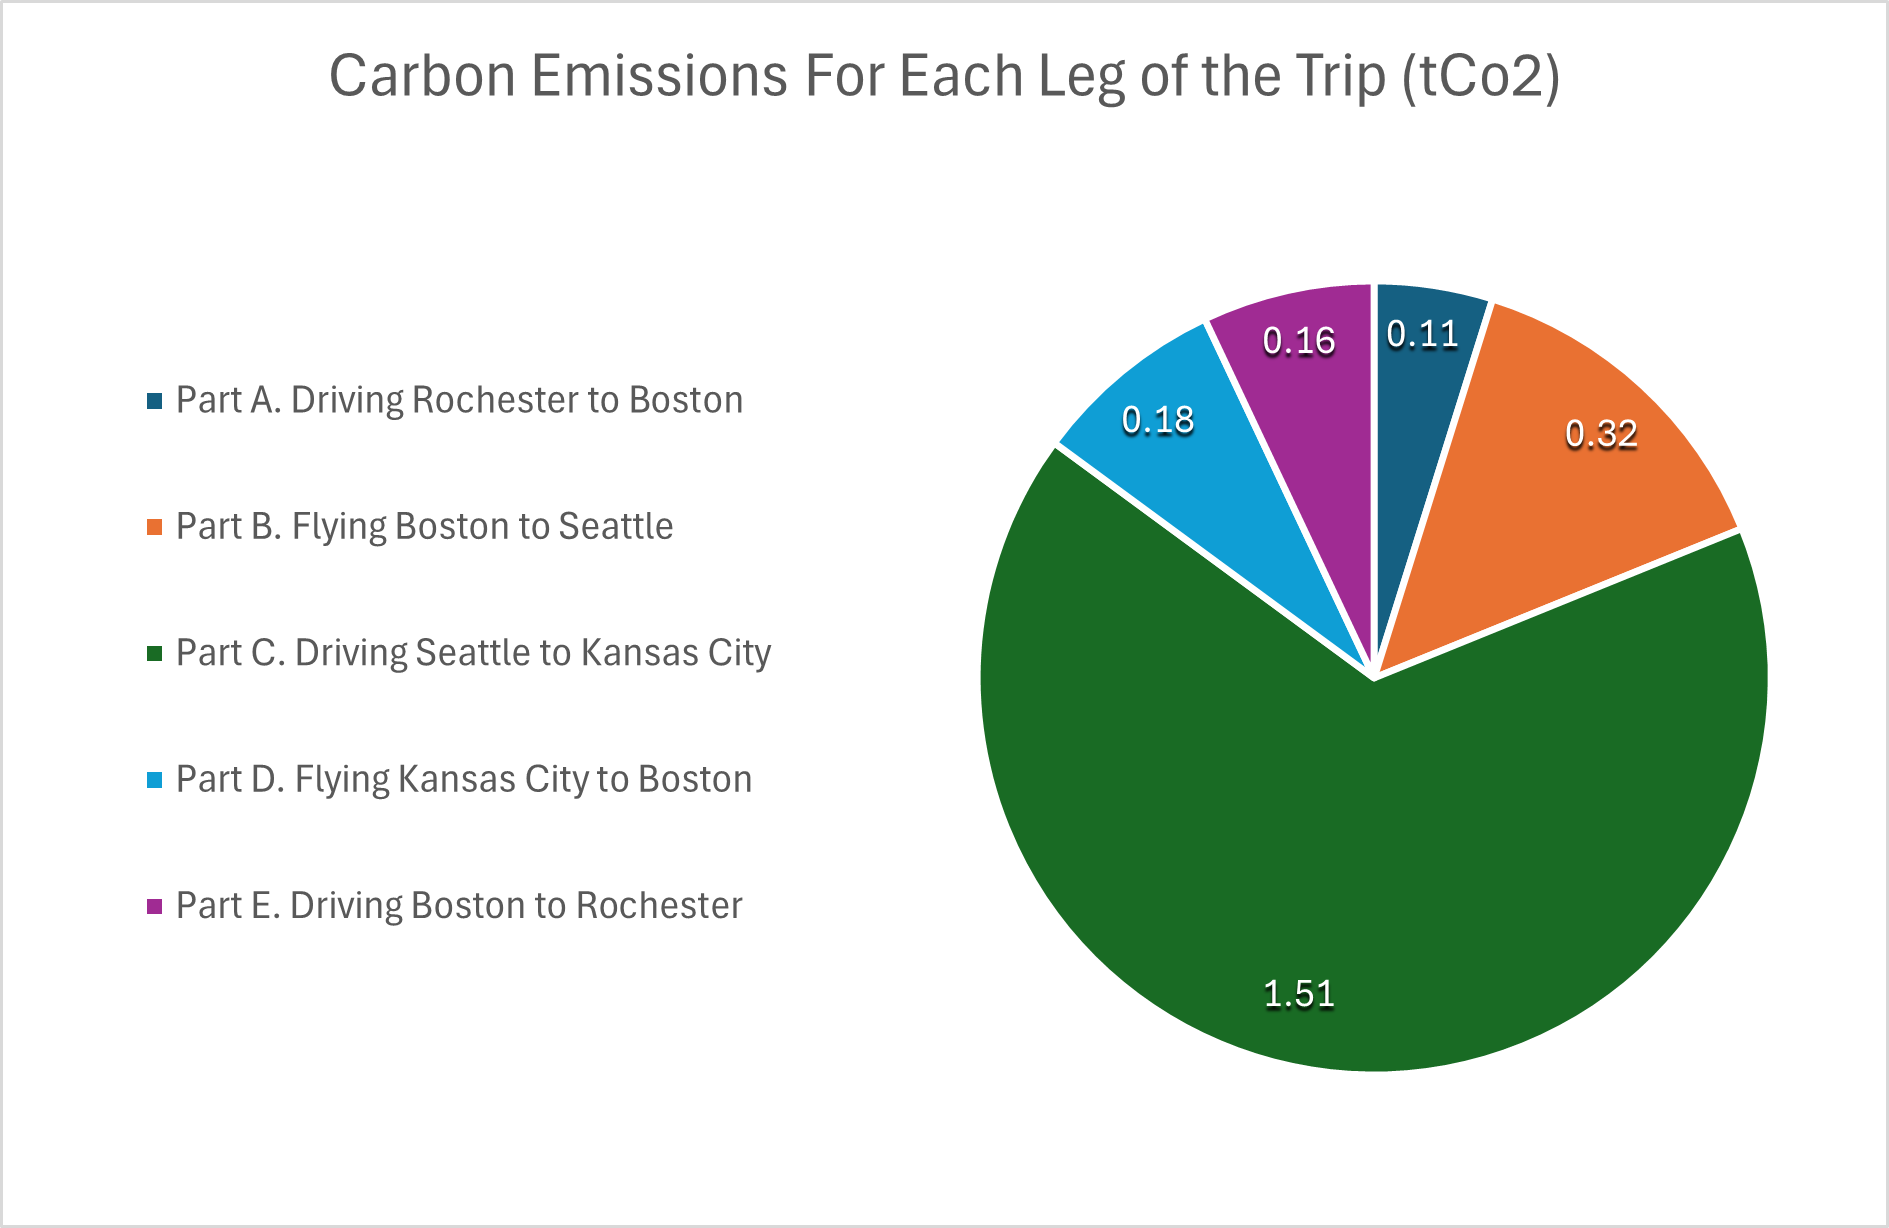
left for the rest of the summer to camp across the U.S. with fellow photographer, Kes Efstathiou. For me, the trip was a kind of reenactment of my therapist’s thought experiment. I drove to Boston and flew from there to meet Kes in Seattle. We drove and lived out of Kes’s Subaru Outback, washing ourselves in rivers and sleeping outside. My body was thawing after weeks of recovery— my nerves slowly reconnecting in my chest as we hiked the coasts, mountains, rainforests, and deserts from Washington State to Missouri. We photographed the landscape and each other, along with constructions we made with debris, flowers, driftwood. I flew out of Kansas City to Boston, and then drove back to Rochester. In total, I travelled 8509 miles and emitted 2.28 tons of CO2.
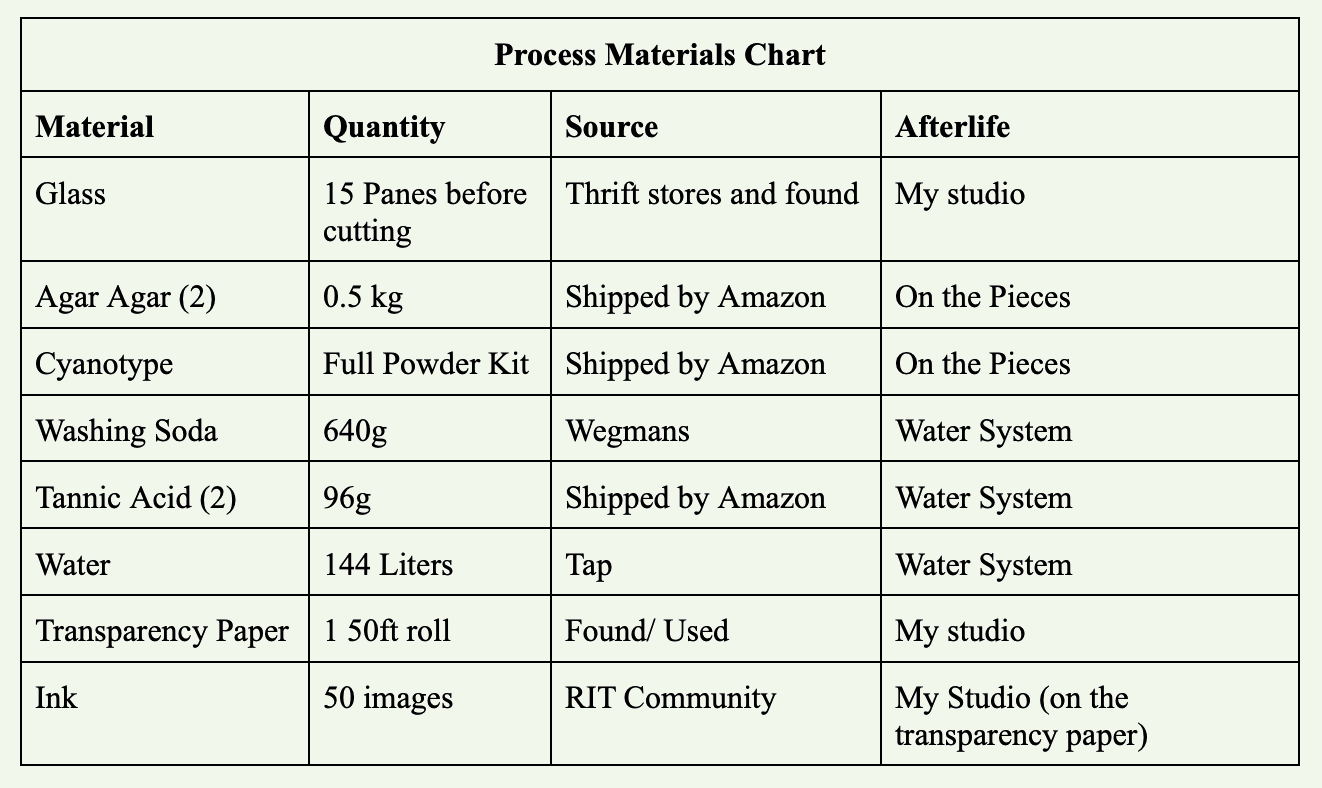
Section 3: Materials & Process
When I returned to school in the fall, I printed some of the photographs on a Canon inkjet printer. The printer stuttered out pictures in conveyer-belt fashion, like packaged tv dinners delivered at the end of a long, secretive industrial process. The ink cartridges, printer parts, and paper sheets have all been similarly rolled out from factory machines- building trash hills and sludge ponds with the waste products.
I began to slowly develop a process that could print my pictures with my limitations: no color inks, no silver chemicals, no new substrate. It was paralyzing for a while. All the sustainable printing I researched was monochromatic like anthotypes (https://www.alternativephotography.com/anthotypes-anthotype-process/) and cyanotypes (https://www.alternativephotography.com/cyanotype-classic-process/). I was brainstorming how I could make a colored image with anthotype and/or cyanotype when I came across a video of Sean McFarland’s work titled Light, Space, Time Assemblage. McFarland uses three projectors, each one casting a different additive color layer of either red, green, or blue to create a full color image of a rock splashed by ocean waves.
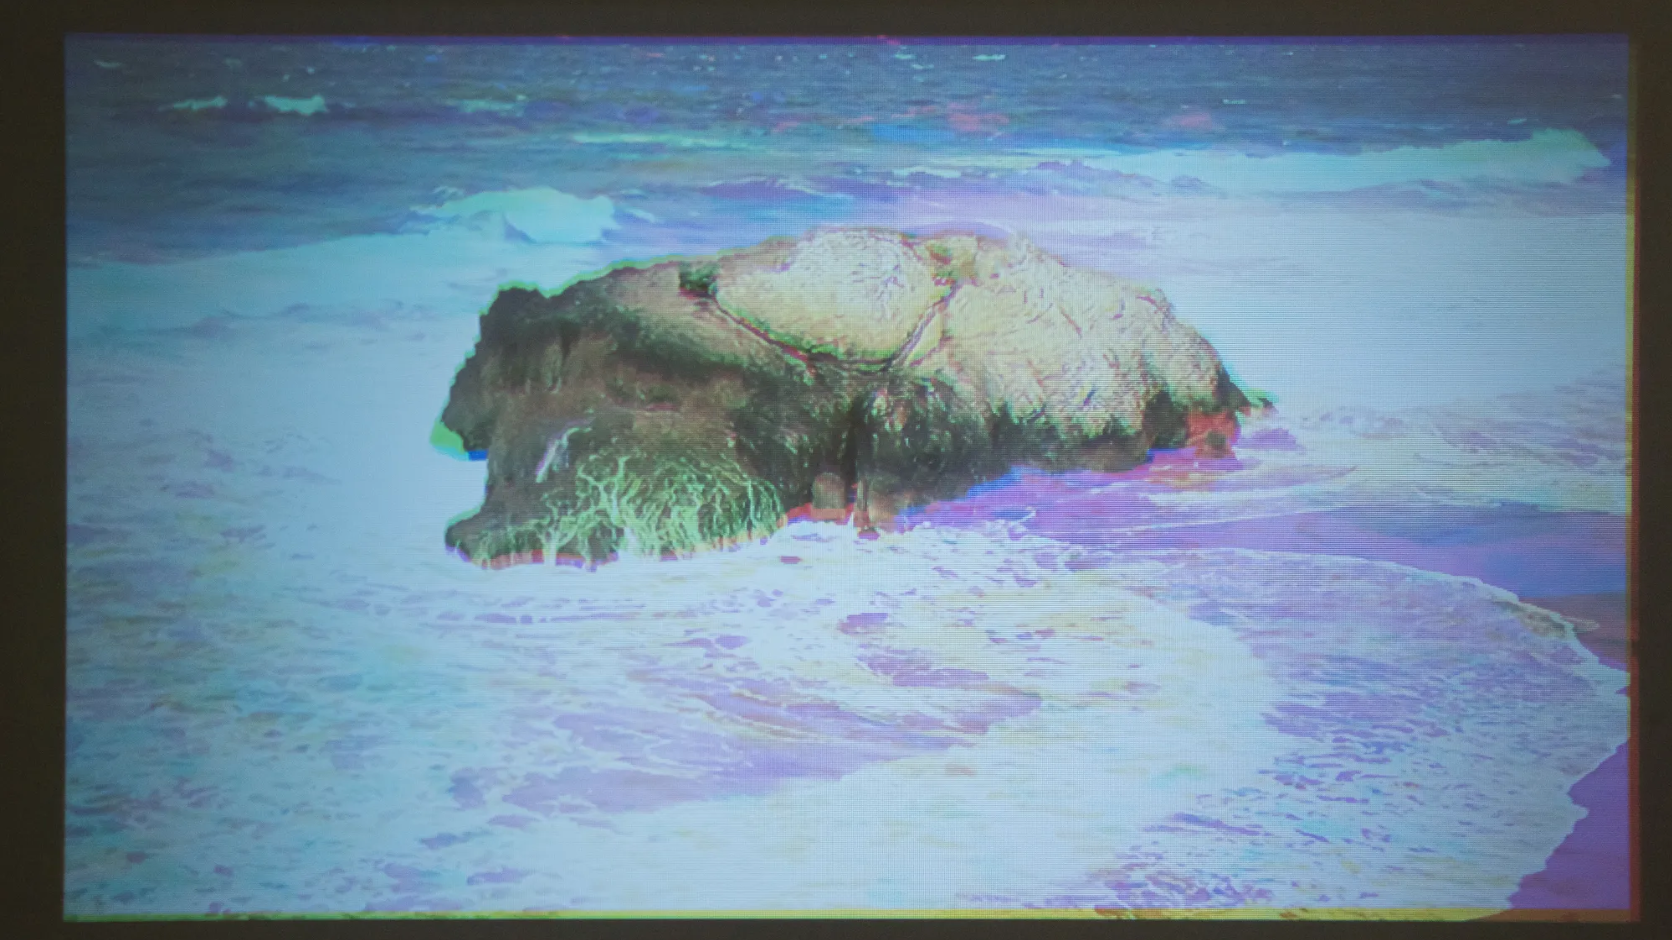
Light, Space, Time Assemblage
Sean McFarland, 2019, three-channel video projection, color, silent, 3 minutes.
McFarland’s piece gave me the idea of using cyan, yellow, and magenta (subtractive colors) printed on glass to illuminate the color layers and create a full colored image. With washing soda, I can change the cyanotype blue to yellow, and with tannic acid, a pulpy powder made from oak species, I can change the blue to an earthy blush pink. To get away from the paper and ink and to print an image in full color, I tried printing the images in layers of blue, yellow, and pink on glass with agar agar. When these layers are stacked atop each other and lit from behind, a full color image is realized.
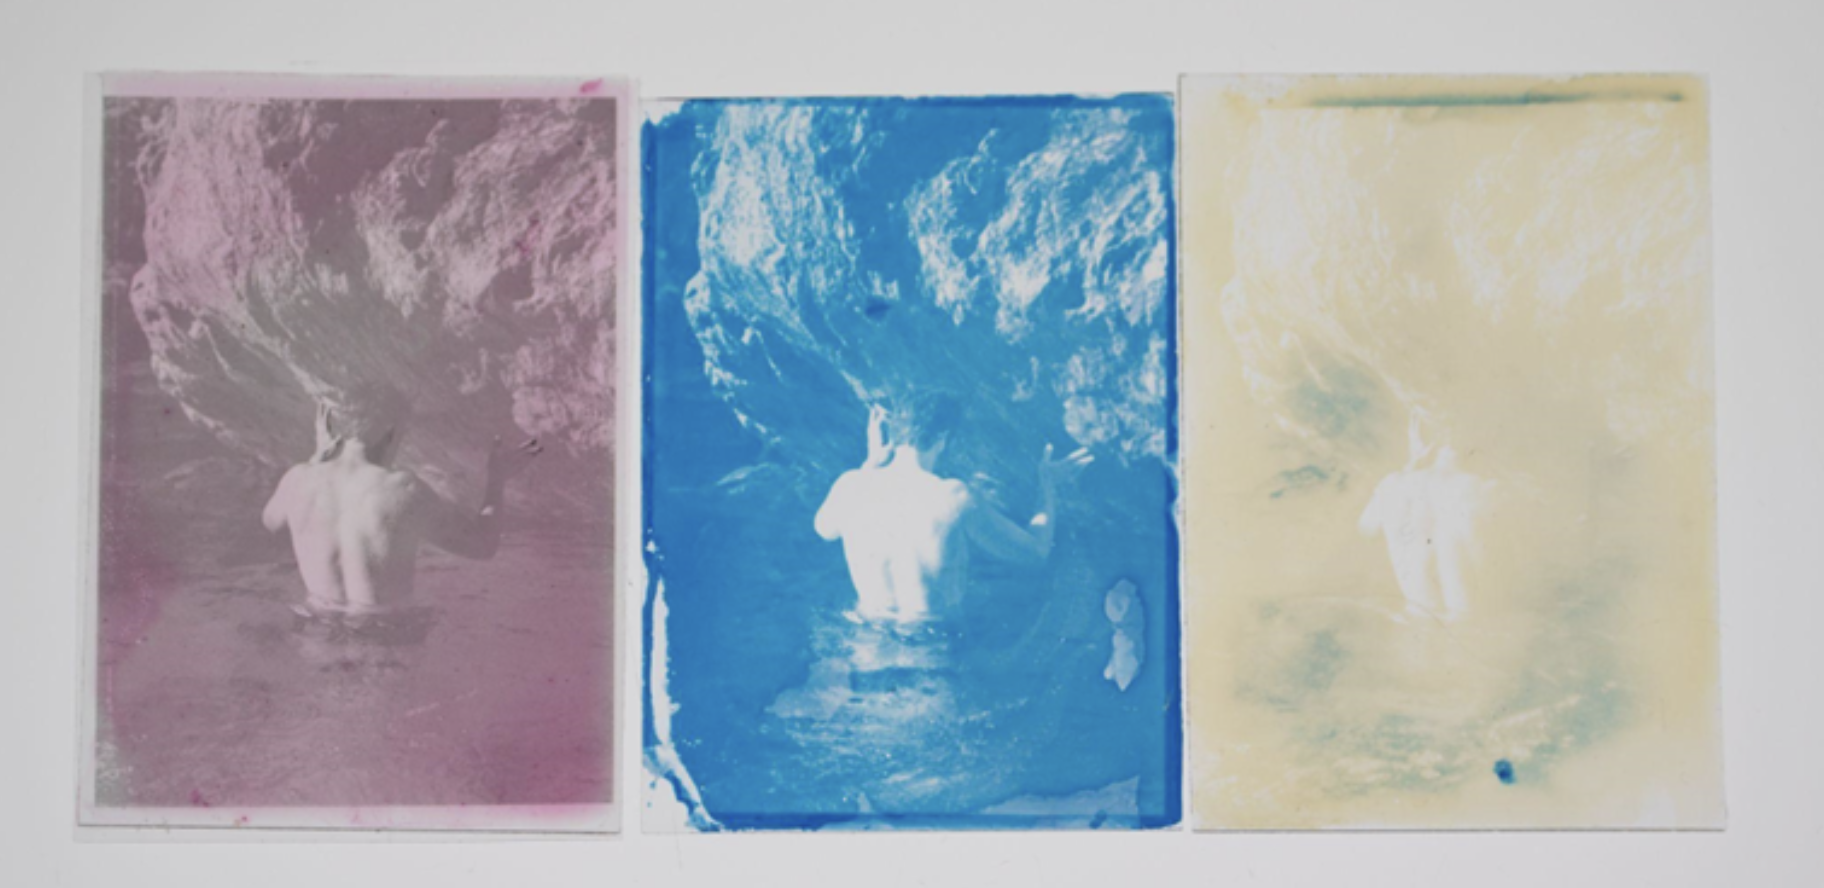
Progress shot of a glass piece before it is assembled.
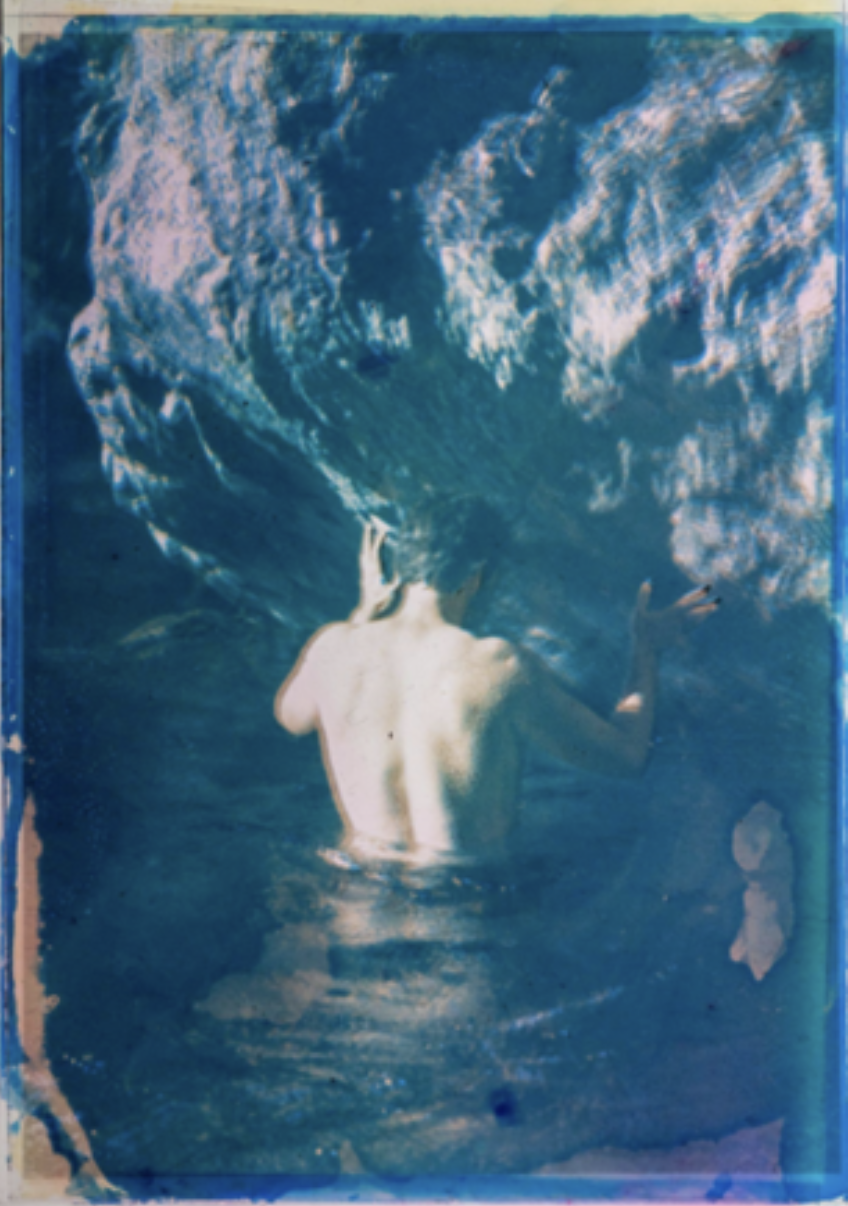
I remember first stacking these glass pieces of Sampson on top of each other. I was alone in my graduate lab late at night, hovering above the communal light table. Seeing the image appear felt like being kissed out of nowhere. I gasped and stared at the image, tilting it back and forth and studying the bubbles from the agar agar gel, the misregistered layers, the oceany smell of agar and tannic acid, and the swells of oranges, yellows, and pinks blushing through the highlights. It was like a tiny 2x3 in. stained glass in my hand, and I became infatuated with making these windows.
Recipe
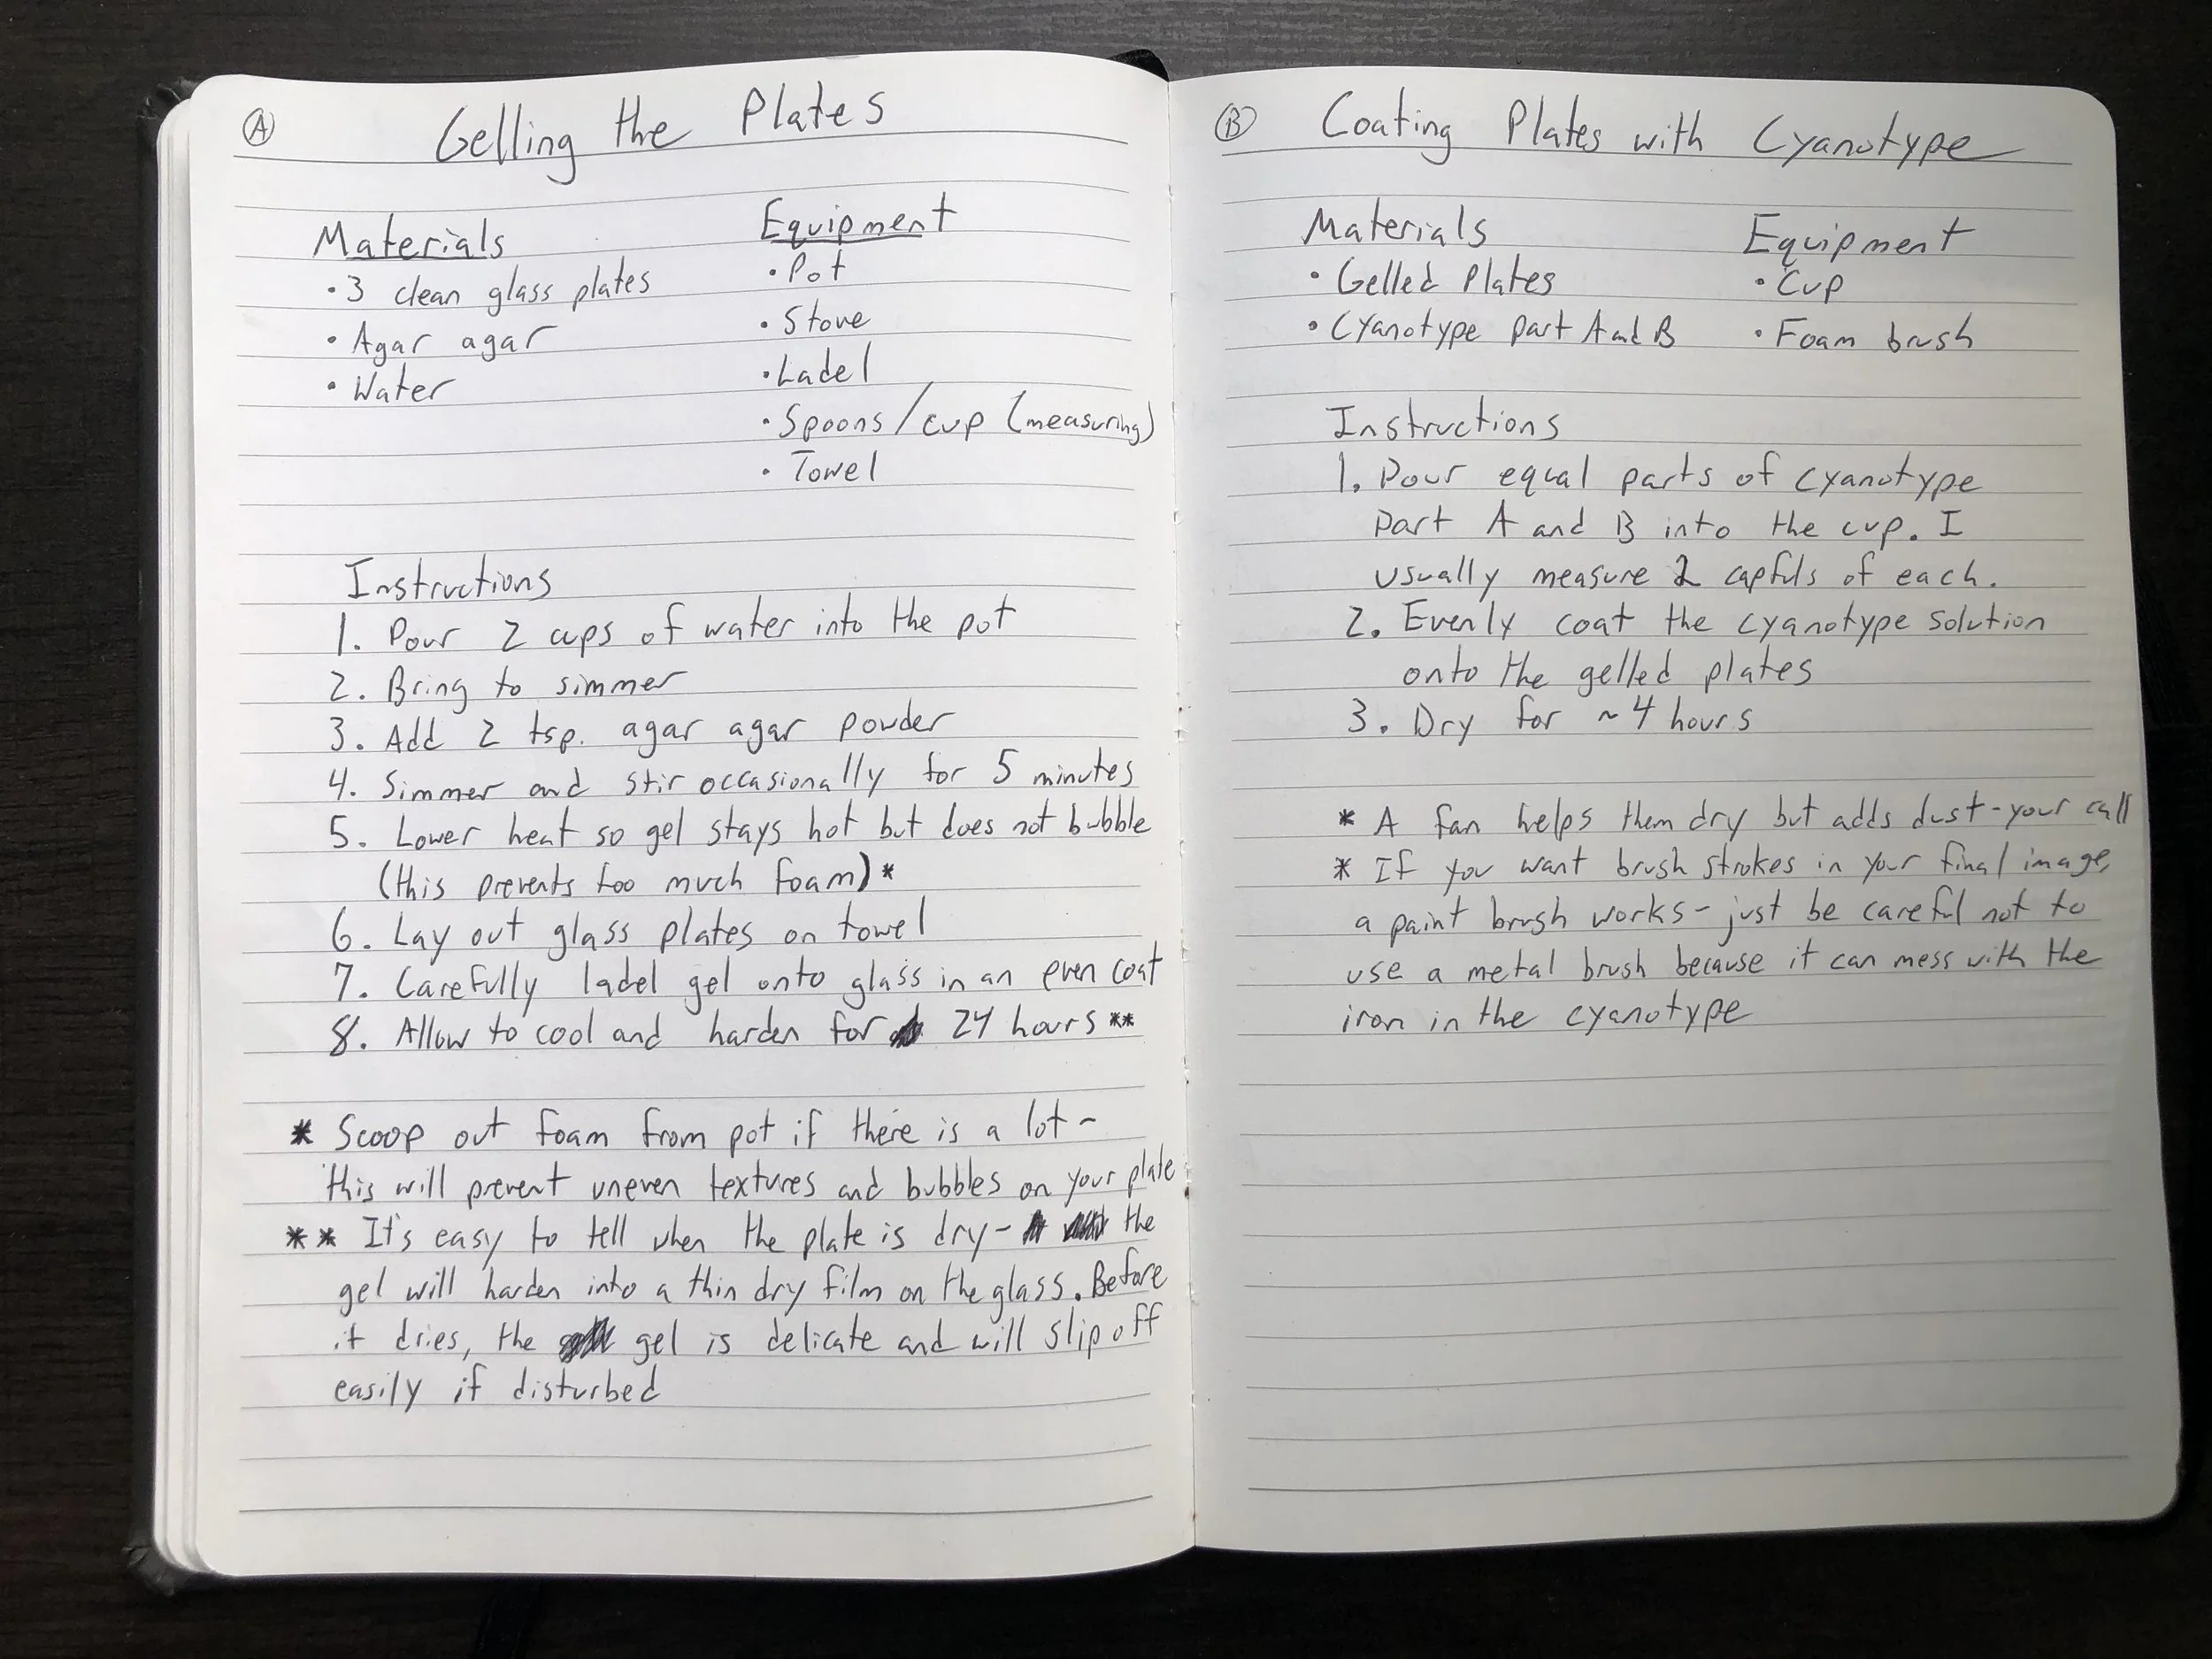
Step A: Gelling the Plates
Materials: 3 Clean Glass Plates Agar agar powder Water
Equipment: Pot Stove Ladle Measuring spoons and cups Towel
Instructions
Pour 2 cups of water into the pot
Bring to simmer
Add 2 tsp agar agar powder
Simmer and stir occasionally for 5 minutes
Lower heat so gel stays hot but does not bubble (this prevents too much foam)
Lay out glass plates on towel
Carefully ladle gel onto glass in an even coat
Allow to cool and harden for 24 hours
*scoop out foam from pot if there is a lot after step 5
*It is easy to tell when the plate is dry- the gel will harden into a thin dry film on the glass. Before it dries, the gel is delicate and will slip off easily if disturbed.
Step B: Coating Plates with Cyanotype
Materials: Gelled Plates from Step A Cyanotype part A and B
Equipment: Cup Foam Brush
Instructions
Pour equal parts of cyanotype Part A and B into the cup. I usually measure a couple capfuls of each.
Evenly coat the cyanotype solution onto the gelled plates with the brush.
Dry for about 4 hours.
*A fan helps them dry but adds dust
*If you want brush strokes in your final image, a paint brush works. Just be careful not to use a metal brush because it can mess with the iron in the cyanotype
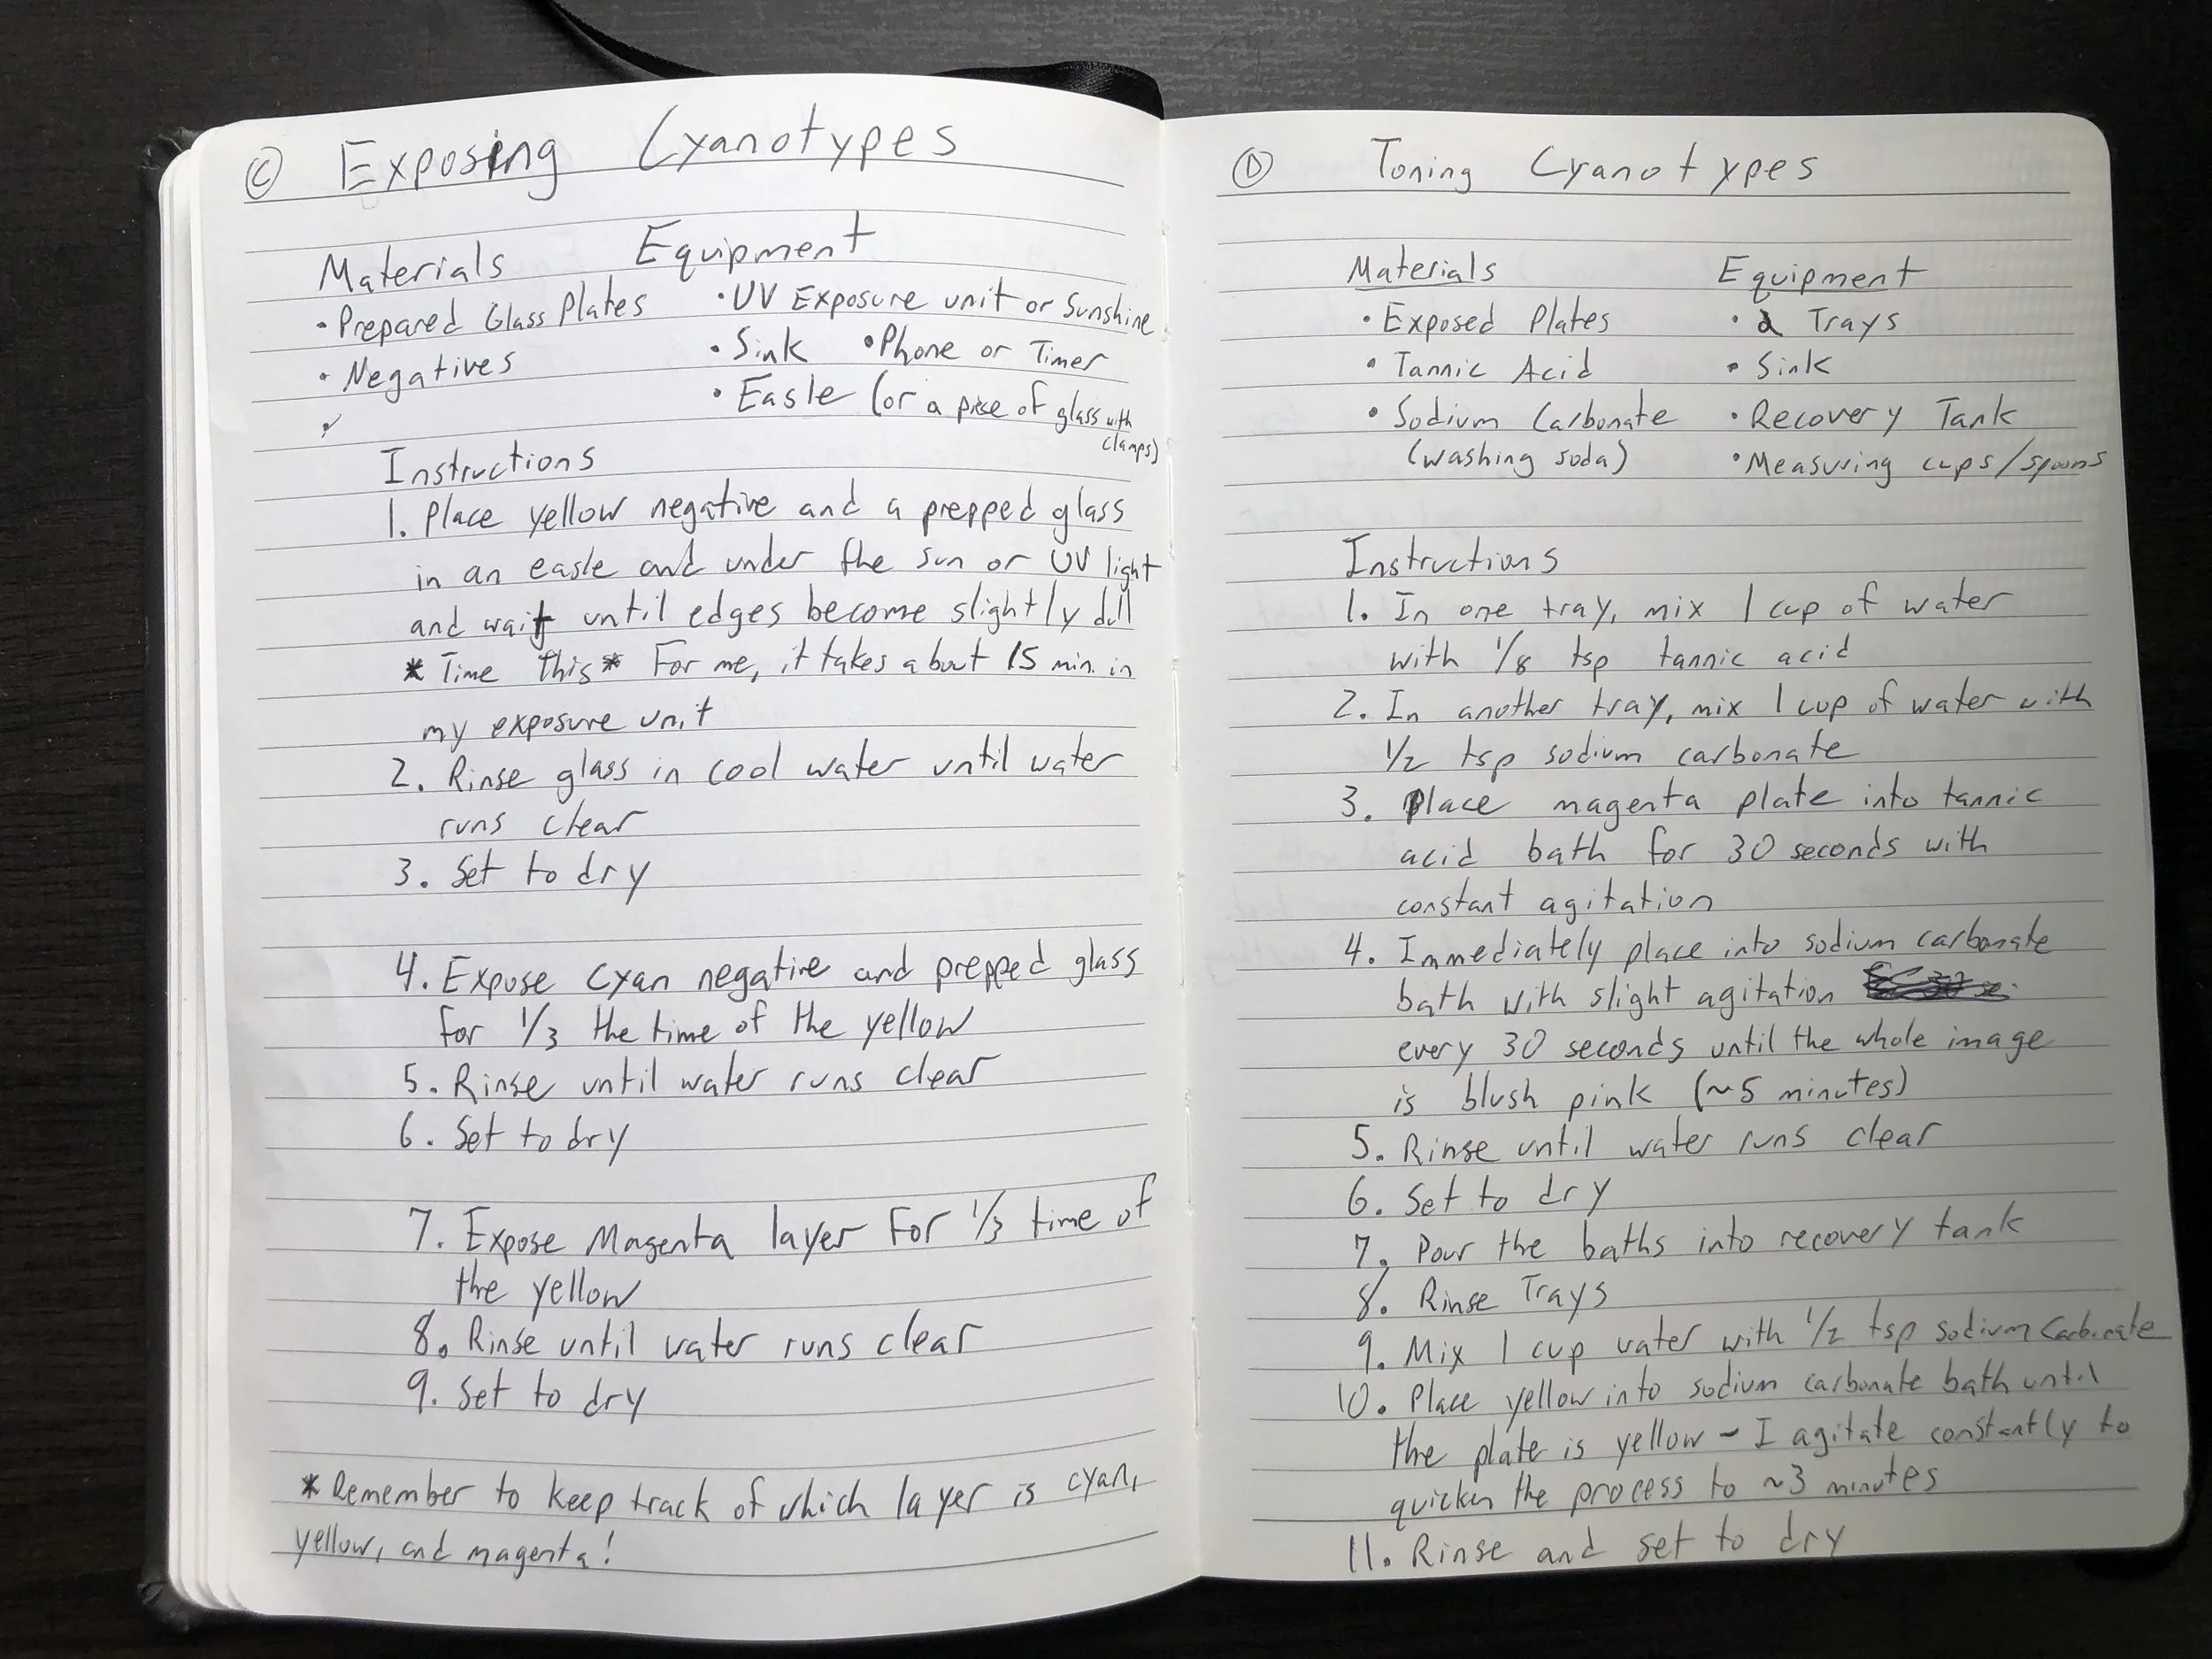
Step C: Exposing Cyanotype
Materials: Prepared Glass Plates Image Negatives
Equipment: UV Exposure Unit or Steady Direct Sunshine Sink Phone or Timer
Easel (or 2 pieces of glass with clamps)
Instructions
Place yellow negative and a prepped glass in an easel and under the UV light or sun and wait until edges become slightly dull. Time this For me, it takes about 15 minutes in the exposure unit or 7 minutes in the sun
Rinse glass in cool water until water runs clear
Set to dry
Expose cyan negative and prepped glass for ⅓ the time of the yellow
Rinse until water runs clear
Set to dry
Expose magenta also for ⅓ the time of the yellow
Rinse until water runs clear
Set to dry
*Remember to keep track of which layer is cyan, magenta, and yellow
Step D: Toning Cyanotypes
Materials: Exposed Plates Tannic Acid Washing Soda
Equipment: 2 Trays Sink Recovery Tank Measuring Cups/Spoons
Instructions
In one tray, mix 1 cup of water with ¼ teaspoon tannic acid
In another tray, mix 1 cup of water with ¼ teaspoon of washing soda
Place magenta plate into tannic acid bath for 30 seconds with constant agitation
Immediately place into washing soda bath every 30 seconds until the whole image is blush pink (about 5 minutes)
Rinse well until water runs clear
Set to dry
Place yellow plate into washing soda, agitating every 30 seconds until the plate turns yellow (about 5 minutes)
Rinse and set to dry
Pour the baths into recovery tank
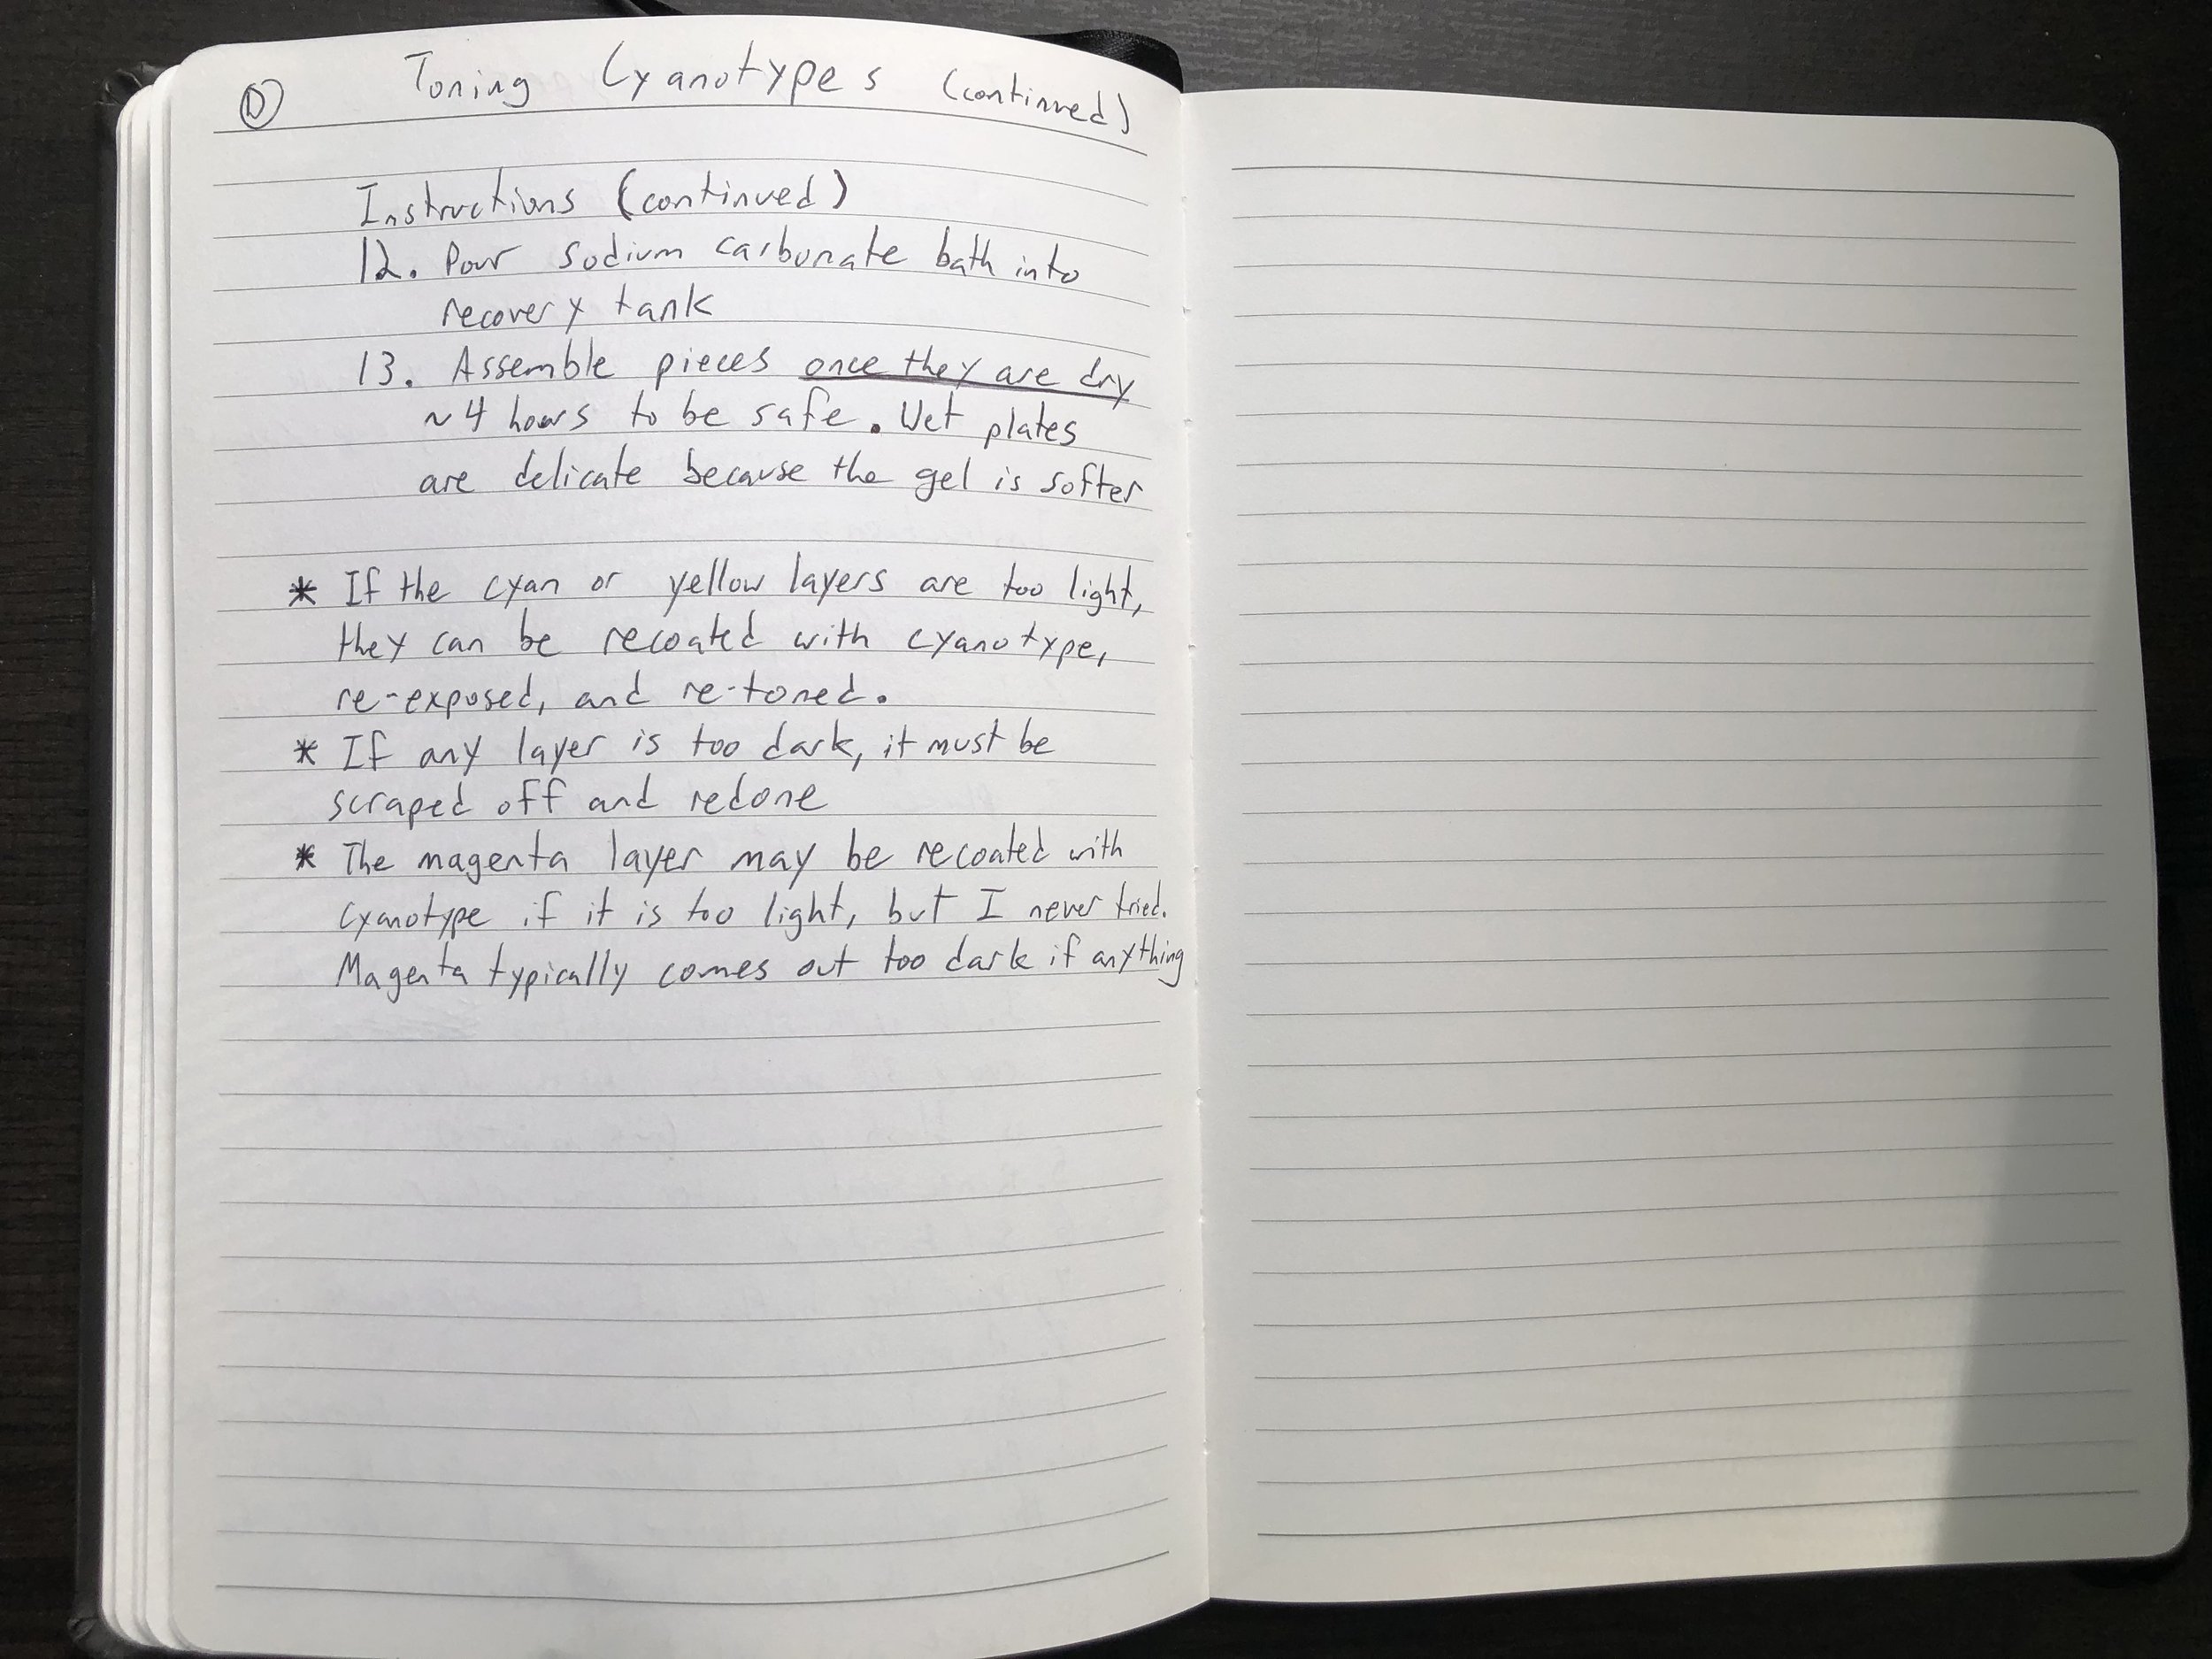
Assemble pieces once they are dry (about 4 hours to be safe). Wet plates are delicate because the gel is softer
*If the cyan or yellow layers are too light, they can be reposted with cyanotype, re-exposed, and re-toned.
*If any later is too dark, it must be scraped off and redone.
*The magenta layer may be recoated with cyanotype if it is too light, but I’ve never tried. Magenta typically comes out too dark if anything.
Materials
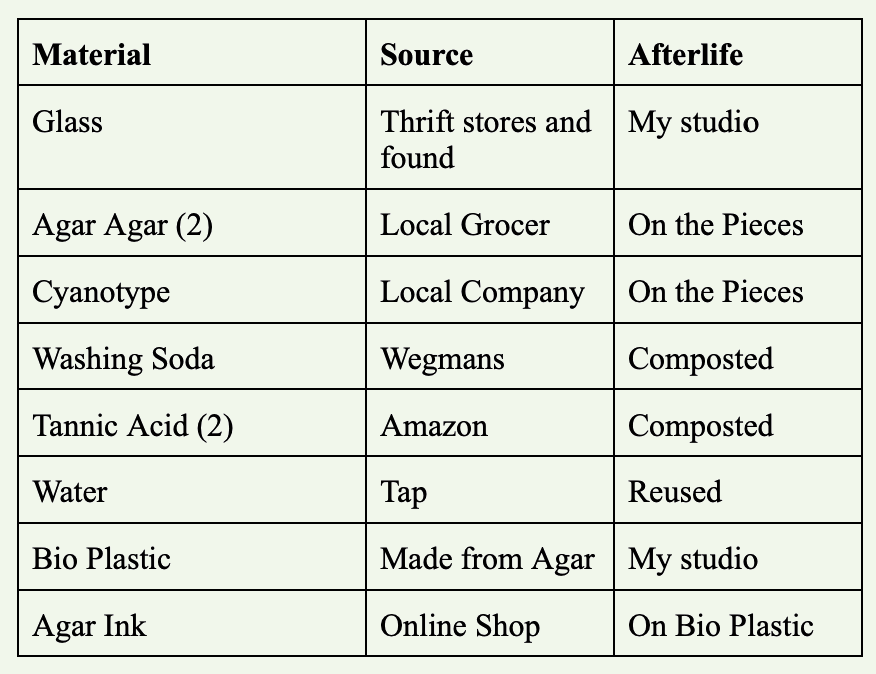
Sourcing used materials for the glass pieces became a playful performance of an alternative economy. I gave my friends rides in exchange for company on dumpster diving trips where we harvested glass from old windows and picture frames. We traded sub sandwiches for old transparency sheets and shared our glue, tacks, tape, and string bountifully.
I was also very lucky to have access to RIT’s photography resources- computers, printers, darkrooms, cameras, UV units, studios, etc. My classmates also quickly became my community, openly sharing tools and materials. Because I was a part of this large community, I was able to use shared equipment rather than buy new equipment and add more waste into the world.
The only materials I couldn’t alternatively source were the cyanotype chemicals, the washing soda, tannic acid, and the agar. Someday, possibly with more understanding of these chemicals and community, I wish to find local and sustainable sources for these materials.
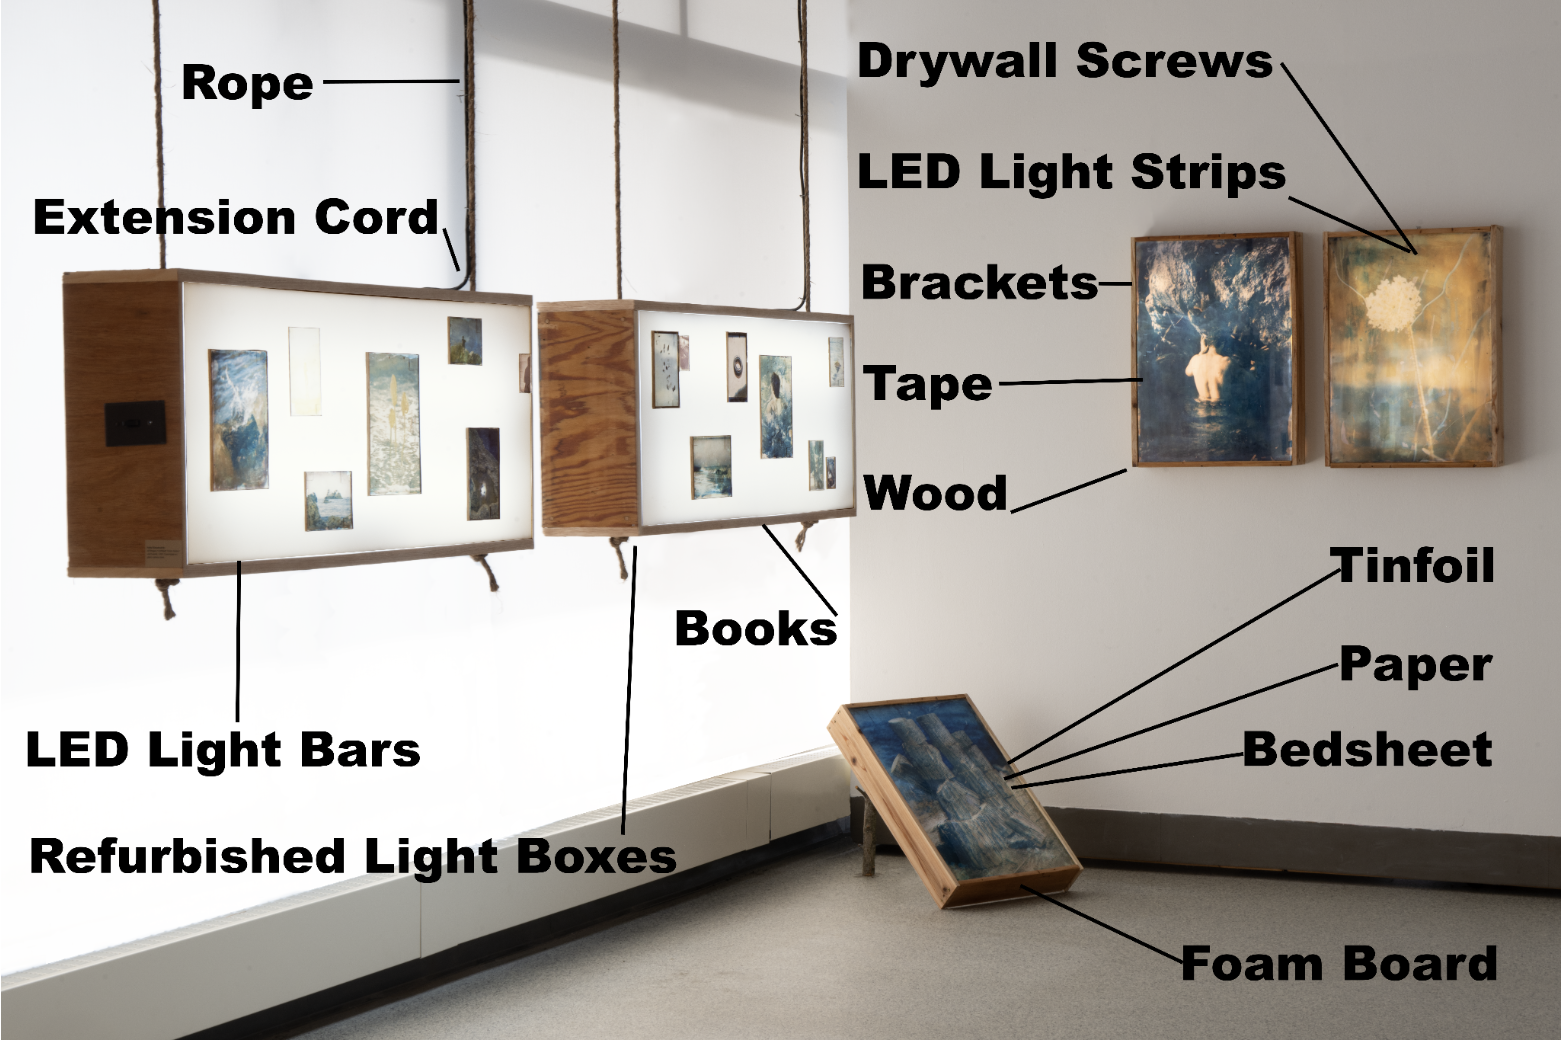
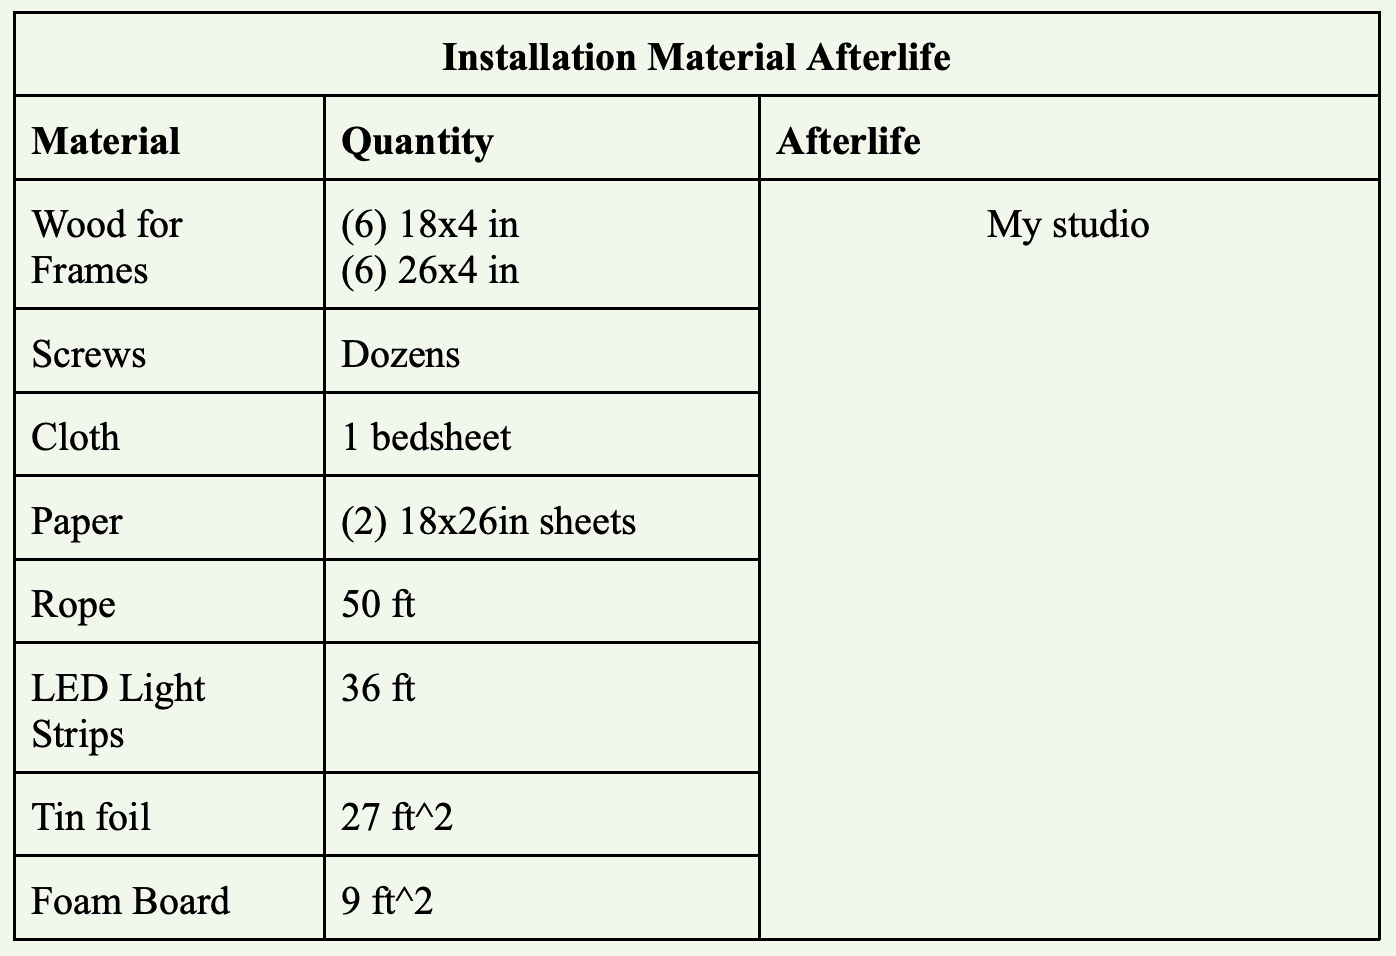
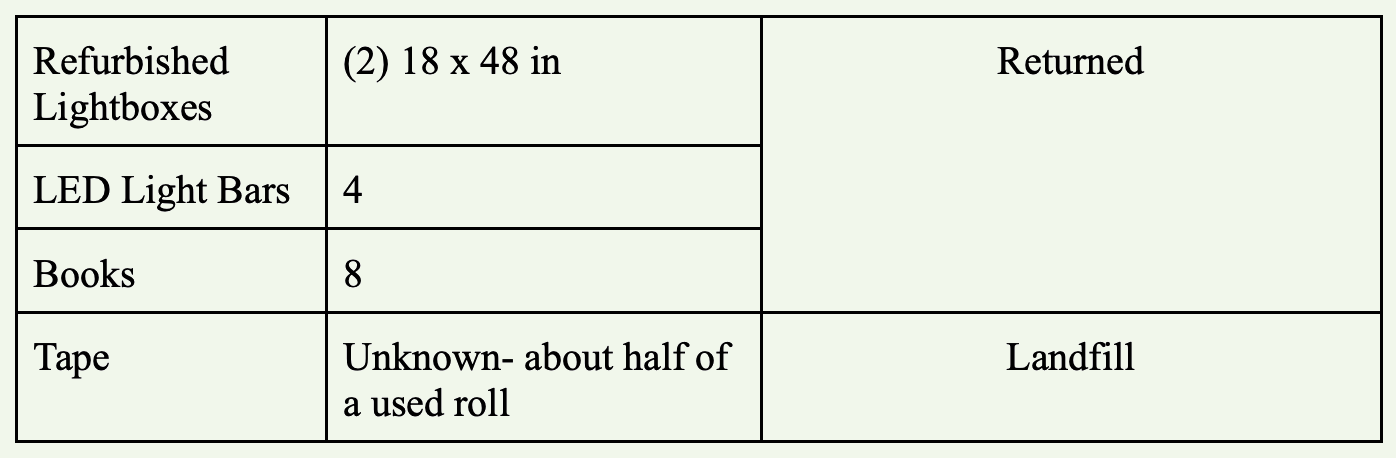
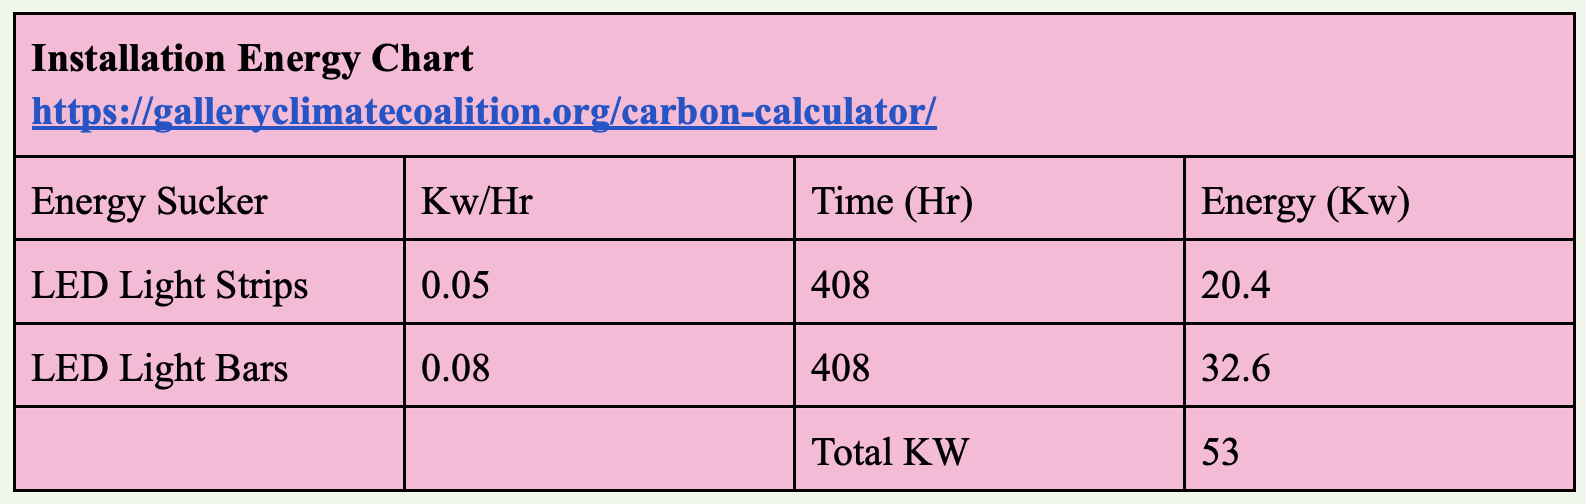
Section 4: Installation
In my installation of the project, my friends helped me hang two large light boxes with LED light bars from the ceiling. Three smaller light boxes were lit with LED light strips. These lights used 53 Kw of electricity during the show, emitting 0.01 tCO2e.
Like the materials used for my process, I used repurposed materials for the installation as much as I could. If I could not find the material I needed, I would borrow it, and when I could not borrow, I bought it.

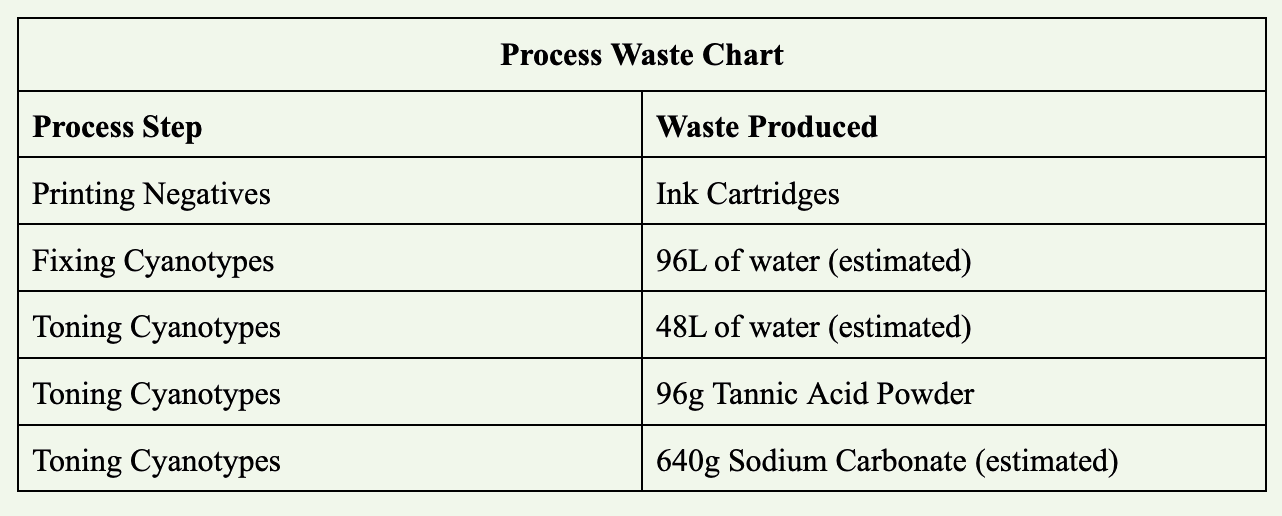
Section 5: Waste Report
Section 6: Afterthoughts
As I finish my report, I think about how my process could lessen its waste and carbon emissions. My travels emitted 2.28 tons of CO2, which is no joke. I ordered my tannic acid and cyanotype chemicals from Amazon.com, and printed my digital negatives on plastic transpancies with toxic black ink.
My travel emissions could have improved by traveling less, or traveling smarter. I carpooled some, but I could have prioritized catching rides and using public transit instead of the convenience of flying.
I crave to improve at printing with sustainable black ink for my negatives, and to make my own transparency paper possibly with agar agar or some other biomaterial. The mirage of rugged individualism tempts me to boil oak bark to make tannic acid and harvest agar agar from red algae. However, I feel it could be best practice to connect with people already doing these things and trade with them.
I’d like to thank The Sustainable Darkroom community for creating such a great resource of folks tinkering and experimenting in their home labs and studios. Further, I’m continuously grateful to my mentor, Deville Cohen, who guided me through my research and inspired me to embrace complexity rather than calculate the immeasurable.